Showing posts with label Registry Tweaks. Show all posts
Showing posts with label Registry Tweaks. Show all posts
Disable Smart Window Arrangement in Windows 7
Windows 7 uses its own intelligence to arrange your windows. For an example, when you drag a window to the top of the screen it automatically maximizes. But if your wanna master Windows 7 at your behest, you need to disable this arrangement. Let's see how to go about it
1. In the Start Search type regedit to edit the registry
2. Go to HKEY_CURRENT_USER\Control Panel\Desktop
3. Set WindowArrangementActive value to 0, and reboot
Now your windows will behave as in the earlier versions.
Acceleration Fix For Mouse in Windows XP
Permanent Acceleration Fix
It seems that even without pointer precision disabled, the mouse under XP is still influenced by an acceleration curve. This is especially noticeable in games. To completely remove mouse acceleration from XP, you will need to go into the registry and adjust the SmoothmouseXYCurve values. Here is how its done.
1. Click Start button
2. Select Run
3. Type 'regedit' in the open textbox
4. Open the tree 'HKEY_CURRENT_USER', select control panel, then select mouse
5. Right clicking, modify the SmoothMouseXCurve and SmoothMouseYCurve hexidecimal values to the following:
Watch Windows Aero in Slowmotion
Here’s a very good trick for Windows Vista Aero users! If you are using Windows Aero, you can use this Registry trick to slow down the animations (i.e. maximize/minimize) when you hold down the Shift key on your keyboard. You have to modify the Registry a little to achieve this!
The advantages of using this trick is that not only does this allow you to see the animations clearer but it also leaves the Flip 3D on the screen even after you let go of the [Ctrl] + [Windows Key] + [Tab] combination. Normally what happens is that Flip 3D exists the screen as soon as you leave this key combination. Whenever you minimize or maximize or close a window, if you hold the Shift key down you will be able see how impressive Vista is in slow motion. Follow these steps:
The advantages of using this trick is that not only does this allow you to see the animations clearer but it also leaves the Flip 3D on the screen even after you let go of the [Ctrl] + [Windows Key] + [Tab] combination. Normally what happens is that Flip 3D exists the screen as soon as you leave this key combination. Whenever you minimize or maximize or close a window, if you hold the Shift key down you will be able see how impressive Vista is in slow motion. Follow these steps:
Create your own BSOD in Windows XP
While it may seem odd to think about purposefully causing a Blue Screen Of Death (BSOD), Microsoft includes such a provision in Windows XP. This might come in handy for testing and troubleshooting your Startup And Recovery settings, Event logging, and for demonstration purposes.
Here's how to create a BSOD:
1. Launch the Registry Editor (Regedit.exe).
2. Go to HKEY_LOCAL_MACHINE\SYSTEM\CurrentControlSet\Services\i8042prt\Parameters.
3. Go to Edit, select New | DWORD Value and name the new value CrashOnCtrlScroll.
4. Double-click the CrashOnCtrlScroll DWORD Value, type 1 in the Value Data textbox, and click OK.
5. Close the Registry Editor and restart Windows XP.
Pin Folders To Start Menu In Windows XP, Vista Or 7
Windows XP, Vista or 7 allows us to pin our most frequently used application to the Start menu by right clicking on it and selecting Pin to Start Menu. This gives us instant access to these applications. If we want any other item to pinned list, we can do so by dragging and dropping it to the Start button or the Start menu. If we want to remove these pinned item we can do so by right-clicking it and clicking Unpin from Start Menu or Remove from This List. The order of the items in this list can be arranged by dragging and dropping them to the preferred location. To add a folder to the Start Menu Pin list, you may use the drag-drop method as stated above. But we cannot pin our frequently used or favourite folders to the Start menu by right clicking on it. Here is a cool trick to pin your folders to the Start menu by right clicking on the folder and selecting Pin to Start Menu:
• Click on the Start menu button and type regedit in the Start menu search box and press Enter. For XP users select Run from the Start Menu and type regedit in the Run dialog box and press enter.
• This will open the registry editor.
• Click on the Start menu button and type regedit in the Start menu search box and press Enter. For XP users select Run from the Start Menu and type regedit in the Run dialog box and press enter.
• This will open the registry editor.
Stop Automatic Reboot Of Windows XP/Vista After Windows Updates
Windows Update will automatically reboot the system when you have your system configured to “Automatically download recommended updates for my computer and install them” and one or more of those updates requires a reboot. This may cause problems when you are working on something important and your work is not saved. So to stop this behaviour use the following registry trick. This trick applies to both Windows XP and Windows Vista.
• Click Start then select Run, type regedit in the Run dialog box and press Enter to open the registry editor.
• Go to the key [HKEY_LOCAL_MACHINE\SOFTWARE\Policies\Microsoft\Windows\WindowsUpdate\AU]
• Create a new DWORD value, or modify the existing value, called NoAutoRebootWithLoggedOnUsers and set it 1. This setting means “do not automatically reboot” and if you want to revert back to the default settings set this value to 0.
Add / Remove Items from New Menu in Windows
In Windows, whenever we right-click on Desktop or Explorer, we get “New” menu which contains shortcuts for various known file types. We can easily create new files using this handy “New” menu.
Sometimes we may want to remove a few unwanted items from “New” menu or we may want to add a few necessary items to “New” menu which are not present. So in this tutorial, I’ll tell you how can you add / remove items to / from “New” menu:
A. To Add an Item in “New” menu:
1. Open regedit and expand “HKEY_CLASSES_ROOT” key.
2. Now look for the file type which you want to add in “New” menu, e.g. for adding MP3 file type look for .MP3 key.
3. Right-click on it and select “New -> Key” and give it name “ShellNew“.
4. In right-side pane, right-click and select “New -> String Value“. Give it name “NullFile” and press Enter.
5. Thats it. You’ll immediately get the file type entry in “New” menu.
B. To Remove an Item from “New” menu:
1. Open regedit and expand “HKEY_CLASSES_ROOT” key.
2. Now look for the file type which you want to remove from “New” menu, e.g. for removing MP3 file type look for .MP3 key.
3. Expand it and delete the “ShellNew” key.
4. Thats it. The file type will be removed from “New” menu.
How to uninstall the Microsoft Java Virtual Machine (JVM)
Microsoft JVM is no longer supported by Microsoft, and it is recommended to remove it and install the Sun Microsystems JVM. The steps for removing Microsoft Java Virtual (JVM) are given below.
• Start -> Run
• RunDll32 advpack.dll,LaunchINFSection java.inf,UnInstall
• The un-install process begins. Click Yes to confirm.
• Reboot when prompted.
• After the machine restarts, delete the following items:
-the \%systemroot%\java folder
-the file java.pnf from the \%systemroot%\inf folder
-the two files jview.exe and wjview.exe from the \%systemroot%\system32 folder
-the HKEY_LOCAL_MACHINE\SOFTWARE\Microsoft\Java VM registry subkey
-the HKEY_LOCAL_MACHINE\SOFTWARE\Microsoft\Internet Explorer\AdvancedOptions\JAVA_VM registry subkey (to remove the Microsoft Internet Explorer (IE) options)
• Microsoft Java is now removed.
You can download Sun's newer JVM for Windows at: http://java.sun.com/getjava/index.html
Turning Off Vista's Built-In CD Burning
Since most computers come with 3rd party programs that are easier to use than Vista's CD/DVD burning,
you can turn this off with a simple registry edit.
1. Start Regedit (Press win+r, then type regedit)
2. Go to HKEY_CURRENT_USER\ Software \ Microsoft \ Windows \ CurrentVersion \ Policies \ Explorer
3. Create a new DWORD key NoCDBurning
4. Give it a value of 1
5. Log off and back on again
Adding the Internet Explorer Icon to the desktop in Vista
By default, the icon for the Internet Explorer 7 does not show up on the Vista desktop
To add it back in again, a registry edit is needed.
Just copy the below code and paste in notepad and save it as anyname.reg
Windows Registry Editor Version 5.00
[HKEY_CURRENT_USER\Software\Microsoft\Windows\CurrentVersion\Explorer\HideDesktopIcons\NewStartPanel]
"{871C5380-42A0-1069-A2EA-08002B30309D}"=dword:00000000
Then log off and back on again.
Adding Custom Sound Event in XP
We all know how to change a sound when window starts. But what if we want to create a Custom sound event. What if we like to add a sound whenever a program is opened? Just imagine how good it would be to add a sound whenever Firefox starts, After all sometimes it takes long to open.
To add a custom sound effect, you need to open your registry, and please do not forget to backup your registry before making any changes.
 1. Go to Start –> Run, type Regedit
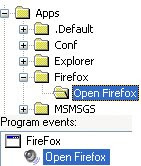
2. Go to HKEY_CURRENT_USER\AppEvents\Schemes\Apps
3. Right Click on Apps, New –> Key
4. Name the key with the programs EXE file, like Firefox for Firefox, Winword for Office word, without the extension
5. Now on right pane, right click Default, and click Modify and type in the same application name
6. Right click on new key and create a new key, and name whatever you want to
Custom Sound
7. Go to Control Panel –> Sounds and Audio devices –> Sounds, there you should be able to see the Custom sound event you added.
You can now assign any sound event you want to.
Do try it, an great tip to personalize your system more :)
1. Go to Start –> Run, type Regedit
2. Go to HKEY_CURRENT_USER\AppEvents\Schemes\Apps
3. Right Click on Apps, New –> Key
4. Name the key with the programs EXE file, like Firefox for Firefox, Winword for Office word, without the extension
5. Now on right pane, right click Default, and click Modify and type in the same application name
6. Right click on new key and create a new key, and name whatever you want to
Custom Sound
7. Go to Control Panel –> Sounds and Audio devices –> Sounds, there you should be able to see the Custom sound event you added.
You can now assign any sound event you want to.
Do try it, an great tip to personalize your system more :)
 1. Go to Start –> Run, type Regedit
2. Go to HKEY_CURRENT_USER\AppEvents\Schemes\Apps
3. Right Click on Apps, New –> Key
4. Name the key with the programs EXE file, like Firefox for Firefox, Winword for Office word, without the extension
5. Now on right pane, right click Default, and click Modify and type in the same application name
6. Right click on new key and create a new key, and name whatever you want to
Custom Sound
7. Go to Control Panel –> Sounds and Audio devices –> Sounds, there you should be able to see the Custom sound event you added.
You can now assign any sound event you want to.
Do try it, an great tip to personalize your system more :)
1. Go to Start –> Run, type Regedit
2. Go to HKEY_CURRENT_USER\AppEvents\Schemes\Apps
3. Right Click on Apps, New –> Key
4. Name the key with the programs EXE file, like Firefox for Firefox, Winword for Office word, without the extension
5. Now on right pane, right click Default, and click Modify and type in the same application name
6. Right click on new key and create a new key, and name whatever you want to
Custom Sound
7. Go to Control Panel –> Sounds and Audio devices –> Sounds, there you should be able to see the Custom sound event you added.
You can now assign any sound event you want to.
Do try it, an great tip to personalize your system more :)
How to back up and restore the registry in Windows
Back up the registry
Manual steps to back up the registry in Windows Vista or in Windows XP
Method 1:
1. Open Regedit, and click File in the Menu bar.
2. Click Export and save this file in a safe place.
3. You can now edit your registry safely. If you feel like you have made some unknown changes, you need to Import this file back.
Method 2:
Windows Vista
1. Click Start button, type systempropertiesprotection in the Start Search box, and then press ENTER.
If you are prompted for an administrator password or for a confirmation, type the password, or click Allow.
2. Wait for Windows to search for available disks and most recent restore points. In the System Properties dialog box, on the System Protection tab, click Create,
3. Type a name for the restore point and then click Create.
4. After the restore point has been created successfully, click OK two times.
Note If System Restore is turned off, click to select the local disk, click Apply and then click Create.
Windows XP
1. Click Start, click Run, type %SystemRoot%\system32\restore\rstrui.exe, and then click OK.
2. On the Welcome to System Restore page, click Create a restore point, and then click Next.
3. On the Create a Restore Point page, type a name for the restore point and then click Create
4. After the restore point has been created, click Close.
Note If System Restore is turned off, you receive a message that asks whether you want to turn on System Restore now. Click Yes. Then, in the System Properties dialog box, click to clear the Turn off System Restore check box, click OK, and then repeat this step.
Restore the registry
Manual steps to restore the registry in Windows Vista or Windows XP
Use System Restore to undo registry changes in Windows Vista or in Windows XP
Windows Vista
1. Click Start button, type systempropertiesprotection in the Start Search box, and then press ENTER.
If you are prompted for an administrator password or for a confirmation, type the password, or click Allow.
2. In the System Properties dialog box, on the System Protection tab, click System Restore,
3. In the System Restore dialog box select Choose a different restore point, and then click Next
4. Select the restore point that you want to use, and then click Next.
5. Confirm your restore point, and then click Finish System restore restores the selected Windows Vista configuration and then restarts the computer.
6. Log on to the computer. When the System Restore confirmation page appears, click OK.
Windows XP
1. Click Start, click Run, type %SystemRoot%\System32\Restore\Rstrui.exe, and then click OK.
2. On the Welcome to System Restore page, click Restore my computer to an earlier time (if it is not already selected), and then click Next.
3. On the Select a Restore Point page, click the system checkpoint. In the On this list select the restore point area, click an entry that is named "Guided Help (Registry Backup)," and then click Next. If a System Restore message appears that lists configuration changes that System Restore will make, click OK.
4. On the Confirm Restore Point Selection page, click Next. System Restore restores the previous Windows XP configuration and then restarts the computer.
5. Log on to the computer. When the System Restore confirmation page appears, click OK.

2 Quick Windows Tricks
One of the things which are never too fast is the computer speed. Everybody complains, there are a lot of programs that promise us help, but in reality, they have a very small influence, if any.
Yet, there are two things you can do in order to get rid of have the sensation of the computer moving a bit faster (I am not sure it gains some speed, but I feel like saving time by not viewing those annoying messages all the time):
1. Deactivate the suggestions given by Windows in the shape of yellow balloons
You already know those messages. You have seen them a hundred times before. They tell you that “Your local area connection is now connected” or other useful, well-known bit of info. To get rid of them, just do the following:
- click on Start, then press R to enter the run command
- type regedit in the small popup window that opened
- press Enter to execute the command
- to disable the messages for all users on the computer: double click on HKEY_LOCAL_MACHINE
- to disable messages only for your user, double click on HKEY_CURRENT_USER
- double click successively on Software, Microsoft, Windows, CurrentVersion, Explorer, Advanced
- right-click on an empty space in the lower part of the current window, then select New and DWORD value
- Type in: EnableBalloonTips and press Enter to confirm
Attention: make sure you use the upper and lower case exactly like that, otherwise it will not work
- Reboot your computer
2. Deactivate error reporting function
When you forcibly shut down an application, you get the message “Please tell Microsoft about this problem”, which you never do (at least, I never did it). If you don’t use it, you can deactivate the function like this:
- Press the keys “Windows” and Pause simultaneoulsy, in order to access System Properties.
- Click on Advanced, then on Send Error Report
- In the next window, check the option Disable error reporting, then uncheck But notify me when critical errors occur
- Click OK to close all open windows
You are ready. If you feel that your computer moves a bit faster, or if you know other useful tricks, please leave a comment here for all of us to improve our learning.
Multiple Columns in Start Menu
To make Windows use multiple Start Menu Columns instead of a single scrolling column (in Programs), like Windows 9x had. Also if you are using Classic Mode in XP:
1. Open RegEdit (by start>run)
2. Go to the key
HKEY_LOCAL_MACHINE\ Software\ Microsoft\ Windows\ CurrentVersion\ Explorer\ Advanced
3. On the right pane, right click and create a new string value StartMenuScrollPrograms
(the above string is case-sensitive)
4. Right click the new string value and select modify
5. Set the value to FALSE
6. Close RegEdit.
CHANGING THE MAXMTU FOR FASTER DOWNLOADS
There are four Internet settings that can be configured, you can get greater throughput (faster Internet downloads) by modifying a few settings.
They are the MaxMTU, MaxMSS and DefaultRcvWindow, and DefaultTTL
1.Open RegEdit (Start>run>regedit)
2.Go to
HKEY_LOCAL_MACHINE\System\CurrentControlset\ Services\ Class\ net\ 000x
(where x is your particular network adapter binding.)
3.Right click on the right panel
4.Select New\String Value and create the value name IPMTU
5.Double click on it and enter then the number you want. The usual change is to 576
6.Similarly, you can add IPMSS and give it a value of 536
(Windows 9X)You can set DefaultRcvWindow, and DefaultTTL by adding these string values to HKEY_LOCAL_MACHINE\ System\ CurrentControlset\ Services\ VXD\ MSTCP
Set the DefaultRcvWindow to 5840 and the DefaultTTL to 128
Note: These settings will slow down your network access speed slightly, but you will probably not even see the difference if you are using a network card. If you are using Direct Cable you should see a slight difference.
CHANGE / ADD RESTRICTIONS IN WINDOWS
If you want to make restrictions to what users can do or use on their computer without having to run Poledit, you can edit the Registry. You can add and delete Windows features in this Key shown below.
Zero is Off and the value 1 is On. Example: to Save Windows settings add or modify the value name NoSaveSettings to 0, if set to1 Windows will not save settings. And NoDeletePrinter set to 1 will prevent the user from deleting a printer.
The same key shows up at:
HKEY_USERS\(yourprofilename)\ Software\ Microsoft\ Windows\ CurrentVersion\ Policies\ Explorer so change it there also if you are using different profiles.
1.Open RegEdit (start>run>regedit)
2.Go to HKEY_CURRENT_USER\Software\Microsoft\CurrentVersion\Policies
3.Go to the Explorer Key
4.Then right click on the right side pane and select "Create Dword".
Select appropriate value name from the list given below and enter 1 for enabling the value and 0 for disabling it
NoDeletePrinter - Disables Deletion of Printers
NoAddPrinter - Disables Addition of Printers
NoRun - Disables Run Command
NoSetFolders - Removes Folders from Settings on Start Menu
NoSetTaskbar - Removes Taskbar from Settings on Start Menu
NoFind - Removes the Find Command
NoDrives - Hides Drives in My Computers
NoNetHood - Hides the Network Neighborhood
NoDesktop - Hides all icons on the Desktop
NoClose - Disables Shutdown
NoSaveSettings - Don't save settings on exit
DisableRegistryTools - Disable Registry Editing Tools
NoRecentDocsMenu - Hides the Documents shortcut at the Start button
NoRecentDocsHistory- Clears history of Documents
NoFileMenu _ Hides the Files Menu in Explorer
NoActiveDesktop - No Active Desktop
NoActiveDesktopChanges- No changes allowed
NoInternetIcon - No Internet Explorer Icon on the Desktop
NoFavoritesMenu - Hides the Favorites menu
NoChangeStartMenu _ Disables changes to the Start Menu
NoFolderOptions _ Hides the Folder Options in the Explorer
ClearRecentDocsOnExit - Empty the recent Docs folder on reboot
NoLogoff - Hides the Log Off .... in the Start Menu
And here are a few more you can play with
ShowInfoTip
NoTrayContextMenu
NoStartMenuSubFolders
NoWindowsUpdate
NoViewContextMenu
EnforceShellExtensionSecurity
LinkResolveIgnoreLinkInfo
NoDriveTypeAutoRun
NoStartBanner
NoSetActiveDesktop
EditLevel
NoNetConnectDisconnect
RestrictRun - Disables all exe programs except those listed in the RestrictRun subkey
This key has many other available keys, there is one to even hide the taskbar, one to hide the control panel and more. I'm not telling you how, as someone may want to play a trick on you. The policies key has a great deal of control over how and what program can run and how one can access what feature.
In the System key you can enter:
NoDispCPL - Disable Display Control Panel
NoDispBackgroundPage - Hide Background Page
NoDispScrSavPage - Hide Screen Saver Page
NoDispAppearancePage - Hide Appearance Page
NoDispSettingsPage - Hide Settings Page
NoSecCPL - Disable Password Control Panel
NoPwdPage - Hide Password Change Page
NoAdminPage - Hide Remote Administration Page
NoProfilePage - Hide User Profiles Page
NoDevMgrPage - Hide Device Manager Page
NoConfigPage - Hide Hardware Profiles Page
NoFileSysPage - Hide File System Button
NoVirtMemPage - Hide Virtual Memory Button
In the Network key you can enter:
NoNetSetup - Disable the Network Control Panel
NoNetSetupIDPage - Hide Identification Page
NoNetSetupSecurityPage - Hide Access Control Page
NoFileSharingControl - Disable File Sharing Controls
NoPrintSharing - Disable Print Sharing Controls
In the WinOldApp key you can enter:
Disabled - Disable MS-DOS Prompt
NoRealMode - Disables Single-Mode MS-DOS
Removing Username in the start menu
Open Registry Editor (Start>Run>regedit) Then Go To :
1. "HKEY_CURRENT_USER\Software\Microsoft\Windows\CurrentVersion\Policies\Explorer"
2. On The Right, Make A New Entry With Right Click On Your Mouse Then Choose "New DWORD Value"
3. Change The Entry's Name Into NoUserNameInStartMenu, Double Click In The New Entry And Fill The Value Data With 1.
4. Press OK, Exit From The Registry Editor.
5. Restart Your Computer.
Remove Banner Ads From Yahoo Messenger
Open Run and type regedit
Then new window will open.
Goto HKEY_CURRENT_USER -> Software -> Yahoo -> Pager -> View
Inside the ‘View’ key there are a several other keys… go through each one and edit the ‘banner url’ string to your liking. It even works if the string is left blank (this causes it to look as if ads were never even implemented)!
Restart Yahoo! IM for the effect to take hold.
This is great for Yahoo! IM 8 users who don’t want to be bothered with ads.
Remove or modify Shortcut Arrow in windows and Vista
Would you prefer to display your shortcuts without the arrow in the bottom left hand corner? This tip will show you how to change the arrow icon or remove it completely
To remove the shortcut arrows:
Method 1:
1. Open your notepad or any script editor
2. Copy and paste the script below into you notepad and save the file with .vbs extension e.g noArrow.vbs, just save it to your desktop
Option Explicit
Dim objShell, strRoot, strRead, strDelete, strCreate
strRoot = “HKEY_CLASSES_ROOT\lnkfile\IsShortCut”
‘ Create the Shell object
Set objShell = CreateObject(”WScript.Shell”)
strDelete = objShell.RegDelete(strRoot)
WScript.Echo “Error No: ” & err.number & ” check ” & strRoot
strDelete = null
WScript.Quit
3. Double click your VBScript, then ‘OK’ the message box. To see the arrows disappear, simply logoff and logon again. Tadaaa!!!! The arrows disappear!!..hahaaaa
Method 2:
Open Registry editor
Go to HKEY_CLASSES_ROOT
Find piffile and lnkfile…………………….and just delete it.
Reboot your computer.
To Change the Icon:
Open the key [HKEY_LOCAL_MACHINE\SOFTWARE\Microsoft\Windows\CurrentVersion\
Explorer\Shell Icons] and create a new string value, or modify the existing value, called ‘29′. Set it to equal the filename, including path, for the icon you want to use for the shortcut arrow. By setting this to a blank icon it has a similar effect to the removal method above, without the side effects.
Restart Windows for the changes to take effect.
Note: This tweak effectively changes the properties of shortcuts so they are no longer considered to be shortcuts by Windows, this may have some slight side effects, such as hot keys not working as before.
Make Internet Explorer Faster
This way is more useful for some people who have a dial up connection. This is work for both Dial up and ADSL connections it makes your internet explorer Browser loads web pages more faster.
METHOD 1
1. click start > run
2. type regedit > enter
3. browse folder HKEY_CURRENT_USER \ Software \ Microsoft \ Windows \ CurrentVersion \ InternetSettings
4. right click @ windows right > New > DWORD
5. type MaxConnectionsPerServer > you can set value (the higher the number, the more good speed you get, eg : 99)
6. create another DWORD >type MaxConnectionsPer1_0Server
7. then put a high value as mentioned above
8. then, restart IE, finished.
METHOD 2
Dont automatically play animations or videos - Animations and videos are usually absolutely ample files to download. Absolutely often, in fact, I ascertain that I dont even wish to see them.
How to make it:
On the card bar, bang on Tools, again on Internet Options on the card that appears.
A new window will arise alleged Internet Options. At the top there are six tabs. Bang on the one on the appropriate that says “Advanced.”
Scroll down to the area that says “Multimedia.” This should be about halfway. Uncheck the two options beneath Multimedia that says “Play animations” and “Play videos.”
Bang on the OK button to abutting the window, and restart Internet Explorer.
Reduce the admeasurement of your page history - Your page history (the account of pages you get while youre accounting in a URL) takes up amplitude in anamnesis that is allocated to Internet Explorer. Freeing up that anamnesis makes your absolute arrangement run faster and makes it accessible for Internet Explorer to advance added anamnesis for apprehension pages, appropriately authoritative pages arise faster.
How to do it:
On the card bar, bang on Tools, again on Internet Options on the card that appears.
A new window will arise alleged Internet Options. Towards the basal of the window should be a band that says “Days to accumulate pages in history:” After that is a box with a amount on it. Bang on the box, backspace to annul the absolute number, and blazon in a baby number. I usually use 1.
Bang on the OK button to abutting the window, and restart Internet Explorer.
Don’t automatically download images - The aspect of web pages that takes the longest time to download is images. If you about-face off this advantage and about-face on addition one, you can still get the accustomed anatomy of web pages, but after the cat-and-mouse for images to download. Usually, the a lot of advantageous advice is in argument form, anyway.
How to do it:
On the card bar, bang on Tools, again on Internet Options on the card that appears.
A new window will arise alleged Internet Options. At the top there are six tabs. Bang on the one on the appropriate that says “Advanced.”
Scroll down to the area that says “Multimedia.” This should be about halfway. Uncheck the advantage beneath Multimedia that says “Show pictures” and analysis the advantage that says “Show angel download placeholders.”
Bang on the OK button to abutting the window, and restart Internet Explorer.
Empty Temporary Internet Files binder if browser is closed - Doing this helps save a lot of harder drive space, and aswell makes surfing faster back your computer isn’t searching through so abounding pages to acquisition out if the adapted page is already in the cache.
How to do it:
On the card bar, bang on Tools, again on Internet Options on the card that appears.
A new window will arise alleged Internet Options. At the top there are six tabs. Bang on the one on the appropriate that says “Advanced.”
Scroll down to the area that says “Security.” This should be the basal section. Analysis the advantage that says “Empty Temporary Internet Files binder if browser is closed.”
Bang on the OK button to abutting the window, and restart Internet Explorer.
Dont save encrypted pages to disk - This has a bifold benefit. First, it saves your computer the time and accomplishment of extenuative pages to the Temporary Internet Files folder. Plus, it makes abiding that there’s no almanac on your harder drive of defended web pages, which are the ones that are acclimated for passwords and such things.
How to do it:
On the card bar, bang on Tools, again on Internet Options on the card that appears.
A new window will arise alleged Internet Options. At the top there are six tabs. Bang on the one on the appropriate that says “Advanced.
Scroll down to the area that says “Security.” This should be the basal section. Analysis the advantage that says “Don’t save encrypted pages to disk.”
Bang on the OK button to abutting the window, and restart Internet Explorer.
Subscribe to:
Posts (Atom)
