
2 Quick Windows Tricks
One of the things which are never too fast is the computer speed. Everybody complains, there are a lot of programs that promise us help, but in reality, they have a very small influence, if any.
Yet, there are two things you can do in order to get rid of have the sensation of the computer moving a bit faster (I am not sure it gains some speed, but I feel like saving time by not viewing those annoying messages all the time):
1. Deactivate the suggestions given by Windows in the shape of yellow balloons
You already know those messages. You have seen them a hundred times before. They tell you that “Your local area connection is now connected” or other useful, well-known bit of info. To get rid of them, just do the following:
- click on Start, then press R to enter the run command
- type regedit in the small popup window that opened
- press Enter to execute the command
- to disable the messages for all users on the computer: double click on HKEY_LOCAL_MACHINE
- to disable messages only for your user, double click on HKEY_CURRENT_USER
- double click successively on Software, Microsoft, Windows, CurrentVersion, Explorer, Advanced
- right-click on an empty space in the lower part of the current window, then select New and DWORD value
- Type in: EnableBalloonTips and press Enter to confirm
Attention: make sure you use the upper and lower case exactly like that, otherwise it will not work
- Reboot your computer
2. Deactivate error reporting function
When you forcibly shut down an application, you get the message “Please tell Microsoft about this problem”, which you never do (at least, I never did it). If you don’t use it, you can deactivate the function like this:
- Press the keys “Windows” and Pause simultaneoulsy, in order to access System Properties.
- Click on Advanced, then on Send Error Report
- In the next window, check the option Disable error reporting, then uncheck But notify me when critical errors occur
- Click OK to close all open windows
You are ready. If you feel that your computer moves a bit faster, or if you know other useful tricks, please leave a comment here for all of us to improve our learning.


Make Orkut Free From Google Ads
Internet is a vast place for people like us who like to surf from one site to another. Social networking sites are just one more place to surf. These sites such as Orkut, MySpace, Hi5 or FaceBook have penetrated so deep into our lives that the moment we start surfing, we logon to these sites first.

Orkut is one of social networking sites owned by Google. Though it's only popular in Brazil and India, but for some reason, Alexa says Orkut is the 9th most visited site in Ireland.
One thing which I have been annoyed of lately is the Google Ads shown by Google in the community homepage as this one.
But applying this trick you can free yourself from these ads in a cool place like Orkut.
Trick:
First and foremost requirement of this trick is that you should be using Mozilla Firefox. This Open Source piece of software is best software I've ever came across.
Fire your Firefox and proceed to this addon link -> AdBlock Plus. According to their developers
"Ever been annoyed by all those ads and banners on the internet that often take longer to download than everything else on the page? Install Adblock Plus now and get rid of them."
Click "Add to Firefox" and install the addon for your browser. Next step is restart your browser. Now everyone must be thinking how this can be called a trick when it comes to just installing a simple addon. Wait!!!
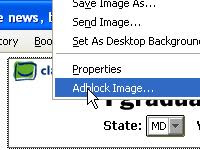
Whenever you want to block an ad, just right click it and click "AdBlock Image". But clicking all the ads inside Orkut is an impossible task because for that you have to search each and every community. But ever noticed that what is common with all these ads, their command format is
http://www.orkut.com/AdsIframe.aspx?xxxxxxx
This page is responsible for generating the Adsense code and placement of ads on pages.
Follow the next step and block all the Google ads. Right click any Google ads and click "Adblock Image". A box will popup and just enter "http://www.orkut.co.in/AdsIframe.aspx" . Bingo !!! You will blocked that main page which generates the ads.
This way you can block all the ads in Orkut. Liked the trick, I'll be waiting for your precious comments.
Orkut is one of social networking sites owned by Google. Though it's only popular in Brazil and India, but for some reason, Alexa says Orkut is the 9th most visited site in Ireland.
One thing which I have been annoyed of lately is the Google Ads shown by Google in the community homepage as this one.
But applying this trick you can free yourself from these ads in a cool place like Orkut.
Trick:
First and foremost requirement of this trick is that you should be using Mozilla Firefox. This Open Source piece of software is best software I've ever came across.
Fire your Firefox and proceed to this addon link -> AdBlock Plus. According to their developers
"Ever been annoyed by all those ads and banners on the internet that often take longer to download than everything else on the page? Install Adblock Plus now and get rid of them."
Click "Add to Firefox" and install the addon for your browser. Next step is restart your browser. Now everyone must be thinking how this can be called a trick when it comes to just installing a simple addon. Wait!!!

Whenever you want to block an ad, just right click it and click "AdBlock Image". But clicking all the ads inside Orkut is an impossible task because for that you have to search each and every community. But ever noticed that what is common with all these ads, their command format is
http://www.orkut.com/AdsIframe.aspx?xxxxxxx
This page is responsible for generating the Adsense code and placement of ads on pages.
Follow the next step and block all the Google ads. Right click any Google ads and click "Adblock Image". A box will popup and just enter "http://www.orkut.co.in/AdsIframe.aspx" . Bingo !!! You will blocked that main page which generates the ads.
This way you can block all the ads in Orkut. Liked the trick, I'll be waiting for your precious comments.
Clean Install Windows Vista With Upgrade DVDs
Traditionally, you are required to have a previous installation of Windows before you can upgrade, e.g. have Windows XP on your system before using Windows Vista Upgrade DVDs.
What if you have ALREADY upgraded to Windows Vista but are having system issues that require formating and re-installing Windows? This trick lets you install a Windows Vista Upgrade, without needing to re-install Windows XP first:
1. Boot from the Windows Vista Upgrade DVD and begin the setup program.
2. When prompted to enter your product key, DO NOT enter it. Click "Next" and proceed with setup - this will install Windows Vista as a 30-day trial.
3. When prompted, select the edition of Windows Vista which you have purchased and continue with the setup.
4. Once setup has been completed and you have been brought to the desktop for the first time, run the install program from within Windows Vista.
5. This time, type in your product key when prompted.
6. When asked whether to perform an Upgrade or Custom (advanced) install, choose Custom (advanced) to perform a clean install of Windows Vista.
(Yes! This means that you will have to install Windows Vista for a second time)
7. Once setup has completed for the second time, you should be able to activate Windows Vista normally. You can also delete the Windows.old directory which contains information from the first Windows Vista installation.
This means that all Windows Vista upgrade DVDs can be used as full retail DVDs.
Multiple Columns in Start Menu
To make Windows use multiple Start Menu Columns instead of a single scrolling column (in Programs), like Windows 9x had. Also if you are using Classic Mode in XP:
1. Open RegEdit (by start>run)
2. Go to the key
HKEY_LOCAL_MACHINE\ Software\ Microsoft\ Windows\ CurrentVersion\ Explorer\ Advanced
3. On the right pane, right click and create a new string value StartMenuScrollPrograms
(the above string is case-sensitive)
4. Right click the new string value and select modify
5. Set the value to FALSE
6. Close RegEdit.
Increase the Browsing and Downloading speed in Windows Vista
With windows Vista you have noticed the slow internet speed. The web browsing and downloading speed is very slow as compare to previous versions of windows. You can open the same sites in windows XP and server 2003 with the normal speed.
Follow the given steps to increase the Vista browsing speed:
First go to Advance tab in Internet Explorer settings and turn off the TLS (Transport Layer Security) encryption option. Here to fix problem with some secure pages turn on the SSL 2.0 (Secure Sockets Layer) feature and click Ok button to close it.
Follow the major fix for this problem:
In windows Vista, the TCP autotuning feature is enabled by default. Some web servers do not respond properly to this feature, so it appears that some sites open with very slow speed.
To use this feature, you will need to be logged into your computer with administrative rights.
First click on Start button and type CMD in Run option then press Enter.
At Command Prompt, type the following command and press enter.
netsh interface tcp set global autotuninglevel= disabled
This command will disable the TCP autotuning feature. Now close the command Prompt and restart your computer after any changes to go into effect.
You can easily restore these setting by typing the following command at Command Prompt.
netsh interface tcp set global autotuninglevel= normal
Now close the command Prompt and again restart your computer after any changes to go into effect.
Increase Hard disk speed In Windows
If you like to increase/optimize your Hard Disk I/O - read/write speed without buying expensive software utilities to do that job or changing the HD, just follow next steps. With doing these steps you will increase Hard disk speed (depends of manufacture and specification, but its worth to try). The most speed improvement is visible with IDE drives; however there are reports that this tweak also does good for SCSI disks.
In any case, it won't harm your system, so try it yourself and let me know what you find!
Steps:
1. Run SYSEDIT.EXE from the start.
2. Expand the system.ini file window.
3. Scroll down almost to the end of the file until you find a line called [386enh].
4. Press Enter to make one blank line, and in that line type
5. Irq14=4096 (note: This line IS CASE SENSITIVE)
6. Click on the File menu, then choose Save.
7. Close SYSEDIT and reboot your computer.
8. Restart windows!
The speed improvement will be noticed just after the system reboots, any system info. software can be used to check the improvement.
Subscribe to:
Posts (Atom)

