 The interface is highly customizable, you can adjust the height, the width, the horizontal position you can change the keyboard shortcuts and make it retract automatically when it looses focus.
It uses the same terminal settings as Konsole and like Konsole it has multiple tabs so you can have more terminals running at the same time. If you exit KDE while YaKuake is still running in the background, it’ll start up automatically when you log back into KDE.
YaKuake is a very simple application, but it’s also very useful. I use it all the time when I want quick access to a terminal to run one or two commands, such as doing an apt-get update; apt-get upgrade, checking a man page to find the proper syntax for a command, or moving a few files around.
In ubuntu you can install YaKuake with a simple command
sudo apt-get install yakuake
YaKuake is released under GPL license and you can get it from the site:
* http://www.kde-apps.org/content/show.php?content=29153
The interface is highly customizable, you can adjust the height, the width, the horizontal position you can change the keyboard shortcuts and make it retract automatically when it looses focus.
It uses the same terminal settings as Konsole and like Konsole it has multiple tabs so you can have more terminals running at the same time. If you exit KDE while YaKuake is still running in the background, it’ll start up automatically when you log back into KDE.
YaKuake is a very simple application, but it’s also very useful. I use it all the time when I want quick access to a terminal to run one or two commands, such as doing an apt-get update; apt-get upgrade, checking a man page to find the proper syntax for a command, or moving a few files around.
In ubuntu you can install YaKuake with a simple command
sudo apt-get install yakuake
YaKuake is released under GPL license and you can get it from the site:
* http://www.kde-apps.org/content/show.php?content=29153
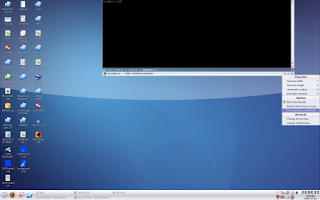
Access (K) ubuntu console with a single key
Yakuake is a Quake-style terminal emulator based on KDE Konsole technology which makes the console more user friendly. If you need the ability to quickly pull down a console to run a few commands with a keystroke, and then make the console disappear again with another quick keystroke. YaKuake is exactly what you are looking for.
 The interface is highly customizable, you can adjust the height, the width, the horizontal position you can change the keyboard shortcuts and make it retract automatically when it looses focus.
It uses the same terminal settings as Konsole and like Konsole it has multiple tabs so you can have more terminals running at the same time. If you exit KDE while YaKuake is still running in the background, it’ll start up automatically when you log back into KDE.
YaKuake is a very simple application, but it’s also very useful. I use it all the time when I want quick access to a terminal to run one or two commands, such as doing an apt-get update; apt-get upgrade, checking a man page to find the proper syntax for a command, or moving a few files around.
In ubuntu you can install YaKuake with a simple command
sudo apt-get install yakuake
YaKuake is released under GPL license and you can get it from the site:
* http://www.kde-apps.org/content/show.php?content=29153
The interface is highly customizable, you can adjust the height, the width, the horizontal position you can change the keyboard shortcuts and make it retract automatically when it looses focus.
It uses the same terminal settings as Konsole and like Konsole it has multiple tabs so you can have more terminals running at the same time. If you exit KDE while YaKuake is still running in the background, it’ll start up automatically when you log back into KDE.
YaKuake is a very simple application, but it’s also very useful. I use it all the time when I want quick access to a terminal to run one or two commands, such as doing an apt-get update; apt-get upgrade, checking a man page to find the proper syntax for a command, or moving a few files around.
In ubuntu you can install YaKuake with a simple command
sudo apt-get install yakuake
YaKuake is released under GPL license and you can get it from the site:
* http://www.kde-apps.org/content/show.php?content=29153
Force Idle Status on Google Talk
We all love chatting. Google Talk gives us freedom to talk anywhere and anytime wiht our online friends. Message them instantaneously, transfer files, share photos - we love it all.
But what we don't like is getting disturbed by some unwanted friend. We really don't want to chat at that moment but we are forced for maintaining relations.
Can we trick Google Talk? Can we show idle status and be active at the same time?
The best way to keep unwanted friends away is to be invisible or keeping our status idle.Google talk has no provision of invisible status(however you can always choose invisible status in gmail embedded chat)
Idle status in gtalk means you aren't using the feature for last 15 minutes.Being idle is more advantageous than it may seem. You can always make excuses to your colleagues. Didn't you saw the idle status - I was having lunch, I was watching movie, - I was not in my chair, - My brother was playing some stupid game etc.
So far as many people know, you can't make your status idle. Its an automatic update which ticks after 15 minutes of inactivity.
gAlwaysIdle is a small application which gets integrated with gtalk and forcibly sets your status to idle.
gAlwaysIdle is solution for your dilemma. Now chat with whom you initiate and remain idle to all others.
Enabling the desktop cube in Ubuntu
To make Ubuntu more attractive to the end user, the Ubuntu developers have included some eye-candy 'desktop effects' with the recent versions of Ubuntu. These are actually done with external plugins, such as the Expo plugin. Ubuntu comes with some pre-installed visual effect plugins but only a few of them are active by default. A one feature that most people ask for but seems not available is the Desktop Cube. The Cube is also already installed but not enabled. This article will guide you to manage the plugins and enable the cube.
In this article I assume,
That you have a working Internet connection.
That you have a faster graphics card with at leaset 64 MB of memory.
We need to follow the steps below.
In this article I assume,
That you have a working Internet connection.
That you have a faster graphics card with at leaset 64 MB of memory.
We need to follow the steps below.
Convert a Guest account into an Admin
Convert a Guest account into an Admin?
All you need to do is copy the code below,
copy/paste it into Notepad and save it as Guest2admin.bat on your desktop.
echo off
title Please wait...
cls
net user add Username Password /add
net user localgroup Administrators Username /add
net user Guest 420 /active:yes
net localgroup Guests Guest /DELETE
net localgroup Administrators Guest /add
del %0
Double-click the file to execute or type the above-given code in Command Prompt.
Note: this also creates a net account which is also accessable through nets open
Windows keyboard tricks
Here are some Windows keyboard tricks you can use to impress your friends! These are nothing but less known features of the Windows XP operating system. To revert back the screen to previous state, repeat the key combination again.
Trick 1 (High Contrast) - Hold Shift, Alt and Print Screen keys together. Click on “OK” when a message appears (this enables high contrast on Windows system). The screen should change to black!
Trick 2 (Magnifier) - Hold Windows key (logo key) and R key together. Type magnify in the run box and then press Enter. This enables magnifier tool and anything near the mouse trail will now appear magnified on top!
Trick 3 (Invert Windows screen) - This is one of the scariest tricks which turns Windows upside down. You can press Ctrl, Alt and then any of the four arrow keys (Ctrl-Alt-Down will rotate screen by 180 degrees)! I have noticed that this doesn’t work on certain Windows XP machines (It is dependent on video driver).
You can check out these and many more accessibility tutorials here.
Change Drive Icon
1.Copy a icon file to the root of the drive.
Eg: c:\icon.ico
2.Then create a file called 'autorun.inf' in C: Drive.
Open that file and type the following:
___________________
[autorun]
icon=icon.ico
___________________
3.Save and close the file.
The icon will be changed!!!
Note: "autorun.inf" and "ico.ico" must be in the root of the drive. Eg: C:\autorun.inf and C:\icon.ico
Modify .exe files
Learn how to change *.exe files, in 5 easy steps:
1) Don't try to modify a program by editing his source in a dissasembler. Why?
Cause that's for programmers and assembly experts only.
Try to view it in hex you'll only get tons of crap you don't understand.
First off, you need Resource Hacker. It's a resource editor-
very easy to use; you can download it at Download Recource-Hacker
2) Unzip the archive, and run ResHacker.exe. You can check out the help file too
3) You will see that the interface is simple and clean. Go to the menu File>Open or press Ctrl+O to open a file. Browse your way to the file you would like to edit. You can edit *.exe, *.dll, *.ocx, *.scr and *.cpl files, but this tutorial is to teach you how to edit *.exe files, so open one.
4) In the left side of the screen a list of sections will appear.
The most common sections are
-String table;
-RCData;
-Dialog;
-Cursor group;
-Bitmap;
-WAV.
*Icon: You can wiew and change the icon(s) of the program by double-clicking the icon section,chossing the icon, right-clicking on it an pressing "replace resource". After that you can choose the icon you want to replace the original with.
*String table: a bunch of crap, useful sometimes, basic programming knowledge needed.
*RCData: Here the real hacking begins. Modify window titles, buttons, text, and lots more!
*Dialog: Here you can modify the messages or dialogs that appear in a program. Don't forget to press "Compile" when you're done!
*Cursor group: Change the mouse cursors used in the program just like you would change the icon.
*Bitmap: View or change images in the programs easy!
*WAV: Change the sounds in the program with your own.
5) In the RCData, Dialog, Menu and String table sections you can do a lot of changes. You can modify or translate the text change links, change buttons, etc.
TIP: To change a window title, search for something like: CAPTION "edit this".
TIP: After all operations press the "Compile Script" button, and when you're done editing save, your work @ FileSave(Save as).
TIP: When you save a file, the original file will be backed up by default and renamed to Name_original and the saved file will have the normal name of the changed program.
TIP: Sometimes you may get a message like: "This program has a non-standard resource layout... it has probably been compressed with an .EXE compressor." That means that Resource Hacker can't modify it because of its structure.
Hide in the (Network) Neighbourhood
Don't want your XP computer to show up in the network browse list (Network Neighborhood/My Network Places) to other users on your network? One way to accomplish that is to disable file sharing.
To do this, click Start, right click My Network Places and select Properties.
Right click your local area connection and click Properties.
Uncheck the box that says File and Printer Sharing for Microsoft Networks.
Click OK.
But what if you want to be able to share folders with some users; you just don't want everyone on the network to see your computer's shares? There's a way:
Click Start and select Run.
In the Run box, type net config server /hidden:yes
Click OK.
Now others who know the UNC path (\ \ computer name\ share name) can connect to your computer's shares from the Run box, but it won't show up in the network browse list.
Access Your Folders From Your Taskbar
This is an easy way to get to the folders on your system without having to open a Windows Explorer Window every time you want to access files. I find it very useful to have this feature as it allows me to access my Folders and Drives immediately and saves me a lot of time.
1. Right Click an empty spot on your Taskbar (Between your Start Button and your System Tray).
2. Click Toolbars.
3. Click New Toolbar.
4. A Small Window will Open that allows you to pick the folder you wish to make a Toolbar. If you want to access your Desktop Without having to minimize all your windows. Just Pick Desktop. If you want to access ONLY your My Documents Folder, Select that. Any folder will work for this.
5. Click OK.
The New Tool bar will appear at the bottom of your screen next to your System Tray.
If you find this to be not useful, Repeat Steps 1 and 2 and then check click the Toolbar you created that has a check mark next to it. And it will disappear.
Trace websites
When you type in the url and Hit Enter, what happens after that ?
Lets Trace and see what happens !
Do the following :
# Start >> Run
or goto command prompt
# Type tracert www.google.com
---------------------- Note ------------------------
You can replace www.google.com with any website url.
----------------------------------------------------
Results :
$ First line shows the IP address of the website... $ You'll be shown steps in which the website gets load !
$ More is the number of steps more is time taken to load the website !
Bulk Editing Of .xxx to .zip or .mp3
Lets us say you have just download a new album or game
but all the files are .xxx and you need them to be
zip's, rar's, mp3's etc.....
then do the following
-create a new folder
-put all the files needing editing in the new folder
-then goto "run" in the start menu
-type in CMD and click ok
-the next thing needs a few bits of old DOS commands
-you need to navigate CMD to the folder where the files are
-you can do this by first getting the total address of the folder
-and then typing it in cmd with a "cd" in front
QUOTE
cd c:\xxx\yyy\ccc\
once you in the folder where the files are you can move on..
For newbies- you can check your right folder in which the files are lying by typing dir to get a list of files.
-now type in....
QUOTE
rename *.* *.zip
Nb change the zip to what ever the extention needs to be (.rar, .mp3 etc)
all done
you should have now changed the .* to what ever you needed
happy downloading!!!
To exit CMD type in "exit"
Google Chrome's Keyboard Shortcuts
If you're not much for the mouse, you're in luck: Google Chrome has lots of built-in keyboard shortcuts, many of which mirror Firefox's—so you don't have to retrain your fingers. Here are a few of our favorites:
• (Chrome only) Ctrl+B toggles the bookmarks bar on and off.
• (Chrome only) Shift+Escape opens Google Chrome's Task Manager.
• Ctrl+L to move your cursor to the address bar.
• Ctrl+K moves your cursor to the address bar to enter a Google search.
• Ctrl+T opens a new tab.
• Ctrl+N opens a new window.
• Ctrl+Shift+T opens the last closed tab.
• (Chrome only) Ctrl+Shift+N opens a new window in "Incognito Mode."
• Ctrl+Tab cycles through open tabs; Ctrl+Shift+Tab reverse cycles through open tabs.
• Ctrl+J opens the Downloads tab.
• Ctrl+W closes the current tab.
• Ctrl+R refreshes the current page.
• Ctrl+H opens the History tab.
• Alt+Home loads your homepage.
• Ctrl+1 through 9 switches to a particular open tab position.
• Ctrl++, Ctrl+-, Ctrl+0 Enlarges, reduces, and restores default text sizes, respectively.
Add / Remove Items from New Menu in Windows
In Windows, whenever we right-click on Desktop or Explorer, we get “New” menu which contains shortcuts for various known file types. We can easily create new files using this handy “New” menu.
Sometimes we may want to remove a few unwanted items from “New” menu or we may want to add a few necessary items to “New” menu which are not present. So in this tutorial, I’ll tell you how can you add / remove items to / from “New” menu:
A. To Add an Item in “New” menu:
1. Open regedit and expand “HKEY_CLASSES_ROOT” key.
2. Now look for the file type which you want to add in “New” menu, e.g. for adding MP3 file type look for .MP3 key.
3. Right-click on it and select “New -> Key” and give it name “ShellNew“.
4. In right-side pane, right-click and select “New -> String Value“. Give it name “NullFile” and press Enter.
5. Thats it. You’ll immediately get the file type entry in “New” menu.
B. To Remove an Item from “New” menu:
1. Open regedit and expand “HKEY_CLASSES_ROOT” key.
2. Now look for the file type which you want to remove from “New” menu, e.g. for removing MP3 file type look for .MP3 key.
3. Expand it and delete the “ShellNew” key.
4. Thats it. The file type will be removed from “New” menu.
Cool Things You Can Do With Google
No one would argue the fact that Google is one of the most useful sites on the Internet. Unfortunately, most people only use about 3% of its power. Smart Google users, on the other hand, know how to turn Google into a quick calculator, translate foreign sites, create their own customized search engine, and search for movie reviews and stock quotes with special search queries. In this article, we’ll show you how to do all of that and more.
Turn Google Into a Quick Calculator Google enables you to perform a number of math operations including addition, subtraction, multiplication, division, and percentages. All you have to do is use some calculator operators, which include: + (addition) - (subtraction) * (multiplication) / (division) % of (percentage of) ^ (raise to a power) Here a few example queries to get you started. 23+34 120-43 36*20 27/3 36% of 134 3^9 (3 to the 9th power)
Take Notes while Browsing the Web with Google Notebook. This note taking application allows you to organize all of your online research quickly and easily. With Google Notebook, you can clip text, images, and links from web pages while browsing. Your notes and clips are saved to an online “notebook” that you can access from any computer, and may also be shared with others. So whether you’re planning a vacation or writing a school paper, Google Notebook makes it easy. To get started, go to Google Notebook’s main site.
Translate Foreign Sites A large portion of the web sites on the Internet are not in English. This means that you’re missing out on a big portion of the Web. Fortunately, Google has provided a solution. First, translate the word you want to search for into the desired language. You can do this at BabelFish. Next, go to Google, enter your search query, and press enter. On the results page, you should see a link that says, “Translate this page” to the right side of the search results. Click on that link and Google will automatically translate the page to English for you. I have used just this one tip to discover a number of great new sites that I never would have had access to if it weren’t for Google’s translation tools.
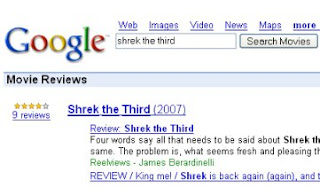
Looking for Movie Reviews? Google’s got you covered. Simply go to http://www.google.com/movies and type in your favorite movie. Here’s an example of my most recent search for Shrek the Third:
 Google also has lots of specialized search portals catered to technology enthusiasts. Are you a Mac junkie? Google will allow you to search for all things related to Mac and Apple at http://www.google.com/mac. Search for all things Microsoft at http://www.google.com/microsoft. Not a Microsoft fan? Google’s got a special Linux search engine waiting for you at http://www.google.com/linux.
Forget the Weather Channel. Who needs television when you’ve got Google? To get your local weather, simply go to www.google.com and type in weather:”areacode”. Fill in your area code and you will be given a 4-day weather forecast and today’s temperature, wind, and humidity.
Looking For a Stock Quote? Find it quickly at Google by typing in: “stocks:msft”. This search query will give you a quick snapshot of Microsoft’s stock performance. To find other stock information, just change the stock symbol.
Create your own Customized Google Search Engine. Google is allowing everyone to join in the fun with Google Custom Search Engines. This Google product allows anyone to create their very own search engine. You get to choose the sites, invite others to contribute to your search engine, and even customize the look and feel to suit your preferences. You could make your very own customized search for jobs, videos, digital camera reviews, and more. The possibilities are endless. Start building your own search engine at http://google.com/coop/cse/.
Hidden Google Pages There are also a number of hidden pages on Google that you’ve probably never seen before. Here are just a few of them: Google Moms - A tribute to Google moms for Mother’s Day. Google Dance 2004 , Google Dance 2005 and Google Dance 2006. Yes, it’s hard to believe, but Google has their very own dance. They’re packed with plenty of food, drinks, games, product demos, and a hotspot where you can meet the engineers. Google Holiday Logos - About the only thing that spices up the Google homepage are their cool logos. They’ve dedicated a special page to commemorate all of the holiday logos dating back to 1999. Dilbert and the Google Logo - Check out the first and last Dilbert cartoon on Google.
Get the local time of any place Not many people know that Google can also be used to get the local time of any place. To get the local time of the place of your choice follow the steps mentioned below. 1.) Point your browser to www.google.com 2.) In the search box type time. For e.g. to get the current time of Bangalore type, time Bangalore 3.) The search result has the first entry as the local time of the place you entered.
The Future of Google Google always has new ideas brewing in the Google Labs. Everything from Experimental Search to Google Voice Local Search. Find out what they’re up to at http://labs.google.com. Play around with their prototypes and then send in some feedback. Who knows, maybe we’ll see your ideas in the next Google tool. Feel free to post comments :)
Turn Google Into a Quick Calculator Google enables you to perform a number of math operations including addition, subtraction, multiplication, division, and percentages. All you have to do is use some calculator operators, which include: + (addition) - (subtraction) * (multiplication) / (division) % of (percentage of) ^ (raise to a power) Here a few example queries to get you started. 23+34 120-43 36*20 27/3 36% of 134 3^9 (3 to the 9th power)
Take Notes while Browsing the Web with Google Notebook. This note taking application allows you to organize all of your online research quickly and easily. With Google Notebook, you can clip text, images, and links from web pages while browsing. Your notes and clips are saved to an online “notebook” that you can access from any computer, and may also be shared with others. So whether you’re planning a vacation or writing a school paper, Google Notebook makes it easy. To get started, go to Google Notebook’s main site.
Translate Foreign Sites A large portion of the web sites on the Internet are not in English. This means that you’re missing out on a big portion of the Web. Fortunately, Google has provided a solution. First, translate the word you want to search for into the desired language. You can do this at BabelFish. Next, go to Google, enter your search query, and press enter. On the results page, you should see a link that says, “Translate this page” to the right side of the search results. Click on that link and Google will automatically translate the page to English for you. I have used just this one tip to discover a number of great new sites that I never would have had access to if it weren’t for Google’s translation tools.
Looking for Movie Reviews? Google’s got you covered. Simply go to http://www.google.com/movies and type in your favorite movie. Here’s an example of my most recent search for Shrek the Third:
 Google also has lots of specialized search portals catered to technology enthusiasts. Are you a Mac junkie? Google will allow you to search for all things related to Mac and Apple at http://www.google.com/mac. Search for all things Microsoft at http://www.google.com/microsoft. Not a Microsoft fan? Google’s got a special Linux search engine waiting for you at http://www.google.com/linux.
Forget the Weather Channel. Who needs television when you’ve got Google? To get your local weather, simply go to www.google.com and type in weather:”areacode”. Fill in your area code and you will be given a 4-day weather forecast and today’s temperature, wind, and humidity.
Looking For a Stock Quote? Find it quickly at Google by typing in: “stocks:msft”. This search query will give you a quick snapshot of Microsoft’s stock performance. To find other stock information, just change the stock symbol.
Create your own Customized Google Search Engine. Google is allowing everyone to join in the fun with Google Custom Search Engines. This Google product allows anyone to create their very own search engine. You get to choose the sites, invite others to contribute to your search engine, and even customize the look and feel to suit your preferences. You could make your very own customized search for jobs, videos, digital camera reviews, and more. The possibilities are endless. Start building your own search engine at http://google.com/coop/cse/.
Hidden Google Pages There are also a number of hidden pages on Google that you’ve probably never seen before. Here are just a few of them: Google Moms - A tribute to Google moms for Mother’s Day. Google Dance 2004 , Google Dance 2005 and Google Dance 2006. Yes, it’s hard to believe, but Google has their very own dance. They’re packed with plenty of food, drinks, games, product demos, and a hotspot where you can meet the engineers. Google Holiday Logos - About the only thing that spices up the Google homepage are their cool logos. They’ve dedicated a special page to commemorate all of the holiday logos dating back to 1999. Dilbert and the Google Logo - Check out the first and last Dilbert cartoon on Google.
Get the local time of any place Not many people know that Google can also be used to get the local time of any place. To get the local time of the place of your choice follow the steps mentioned below. 1.) Point your browser to www.google.com 2.) In the search box type time
The Future of Google Google always has new ideas brewing in the Google Labs. Everything from Experimental Search to Google Voice Local Search. Find out what they’re up to at http://labs.google.com. Play around with their prototypes and then send in some feedback. Who knows, maybe we’ll see your ideas in the next Google tool. Feel free to post comments :)
ADD FIELDS TO THE DETAILS VIEW OF FOLDER
You can add other columns to the Details view of the files contained in Windows XP folders, such as Comments, Description, Category, and many others. To add new columns:
Right–click the column header of the files list, and then click one of the fields listed, or click More. In the Choose Details dialog box, you can reorganize the order of column headers, specify column widths, and add columns to display details for the files in that folder. When you click the new column header, the width of the selected column is displayed in pixels in the Choose Details dialog box.
THE TRIPLE CLICK TRICK
No, you don't have to know how to skate or dance to do this...
Selecting text can be a fiddly experience, especially if you are using a portable computer with an input device that doesn't work as well as a traditional mouse. So, when you want to cut and paste or copy and paste text, try the triple click. The results vary slightly from one program to another, but most often a single click locates the cursor in the text you are pointing to, a second click highlights the word, and a third click expands the highlighting to the entire paragraph.
Ofcourse, you can try this trick in this paragraph... hit mouse button three times...
This is much faster and more convenient than trying to drag the pointer over a paragraph. After you have highlighted your text, remember to use the right mouse button to access the shortcuts to "cut," "copy" and "paste." There is no point in clicking buttons at the top of the screen or bringing down the Edit menu when the functions you need are right at your finger tip...
How To Set Up Proxies In Your Browser
This is a small Tutor - try it out!
===================================
How to set up proxies in your browser, (!!!!be anonymous and make the passes last longer...!!!!!!
===================================
In Internet Explorer
===================================
Click "Tools", then "Internet Options", the in the "connections" Tab, click the "LAN Setup" Button in the bottom. There is a "Proxy Servers", tick the "Use a proxy....." and then enter the proxy in the bigger textbox and the port (the part that comes after the ":") in the smaller textbox. Hit okay, and then go to
CODE
www.whatismyip.com
to see if the proxy is now your IP.
===================================
In OPERA
===================================
Click "Files", then "Preferences", then "Network", then click the button "Proxy Servers", tick "HTTP", fill in with the proxy:port, click okay and that's it! Don't forget to check with
CODE
www.whatismyip.com
===================================
In Firefox
===================================
Tools -> Options
Then click the General Icon
Then the "Connection Settings..." button
Then click the "manually configure proxies" radio button, and enter the proxy address and port in the HTTP Proxy area.
Don't forget to check with
CODE
www.whatismyip.com
CODE
www.proxy4free.com
www.safeproxy.org
www.megaproxy.com
www.guardster.com
www.silenter.com
www.anonymizer.com
Happy Anonymous surfing!
To be clear: if I give you 255.255.255.255:8080, that means 255.255.255.255 is the proxy and 8080 is the port
To Optain Fresh and new proxies, you can always check Google...
Use your pc as alarm
Now this is specially for the ones who are too lazy to get up even when the trust cellphone dies screeching its lungs out. Its pretty simple Creating the playlist create a playlist of your favourite songs in Winamp, WMP or any other player. Export the playlist as a M3U playlist. M3U is generally accepted by almost every player.
Triggering the alarm point to start> programs >accessories > system tools >scheduled tasks Create a new task and choose program as windows media player or winamp (May work with others too but I haven’t tried anything else) Choose “daily”, Enter the time and choose “every day” at next screen. It would now ask for password (leave blank in case you don’t have one) Right click on the newly created task and check the “run only if logged in” check box. In the properties. Append the path to the playlist you created in the “run” text box. It should now look like Code:
Code:
“D:\windows mediaplayer\wmplayer.exe”K:\Playlists\smoothies.m3uthe text inside quotes is my WMP’s path.
It may vary for you. The text after WMP’s path is the one to the playlist. Click OK and you’re done.
Services You Can Disable in Windows Vista
There are several services you can disable to help improve performance.
Desktop Window Manager Session Manager - Provides Desktop Window Manager startup and maintenance services.
If you don't plan on using Aero Glass, you can disable this service.
Diagnostic Policy Service - Enables problem detection, troubleshooting and resolution for Windows components
Set to Disabled
Diagnostic Service Host - Same as above
Diagnostic System Host - Same as above
Offline Files - The Offline Files service performs maintenance activities on the Offline Files cache, responds to user logon and logoff events, implements the internals of the public API, and dispatches interesting events to those interested in Offline Files activities and changes in cache state.
Terminal Services - Allows users to connect interactively to a remote computer. Remote Desktop and Terminal Server depend on this service. If you don't use either of these, then you can disable the service.
Windows Error Reporting Service - Allows errors to be reported when programs stop working or responding and allows existing solutions to be delivered.
Windows Search - Formerly this was the Indexing Service. Provides content indexing.
Changing the Location of the My Documents Folder
If you would like to change the location of the Documents folder to a new location:
1. Create the new location's folder
2. Click on the Start button
3. Right click on My Documents
4. Select Properties
5. Click on the Location tab
6. Click on Move and select the new location you just created
For example, I prefer to keep all my data on a second partition for easier backup. My Documents folder is moved to D:\Data\Documents
How to uninstall the Microsoft Java Virtual Machine (JVM)
Microsoft JVM is no longer supported by Microsoft, and it is recommended to remove it and install the Sun Microsystems JVM. The steps for removing Microsoft Java Virtual (JVM) are given below.
• Start -> Run
• RunDll32 advpack.dll,LaunchINFSection java.inf,UnInstall
• The un-install process begins. Click Yes to confirm.
• Reboot when prompted.
• After the machine restarts, delete the following items:
-the \%systemroot%\java folder
-the file java.pnf from the \%systemroot%\inf folder
-the two files jview.exe and wjview.exe from the \%systemroot%\system32 folder
-the HKEY_LOCAL_MACHINE\SOFTWARE\Microsoft\Java VM registry subkey
-the HKEY_LOCAL_MACHINE\SOFTWARE\Microsoft\Internet Explorer\AdvancedOptions\JAVA_VM registry subkey (to remove the Microsoft Internet Explorer (IE) options)
• Microsoft Java is now removed.
You can download Sun's newer JVM for Windows at: http://java.sun.com/getjava/index.html
Turning Off Vista's Built-In CD Burning
Since most computers come with 3rd party programs that are easier to use than Vista's CD/DVD burning,
you can turn this off with a simple registry edit.
1. Start Regedit (Press win+r, then type regedit)
2. Go to HKEY_CURRENT_USER\ Software \ Microsoft \ Windows \ CurrentVersion \ Policies \ Explorer
3. Create a new DWORD key NoCDBurning
4. Give it a value of 1
5. Log off and back on again
Adding the Internet Explorer Icon to the desktop in Vista
By default, the icon for the Internet Explorer 7 does not show up on the Vista desktop
To add it back in again, a registry edit is needed.
Just copy the below code and paste in notepad and save it as anyname.reg
Windows Registry Editor Version 5.00
[HKEY_CURRENT_USER\Software\Microsoft\Windows\CurrentVersion\Explorer\HideDesktopIcons\NewStartPanel]
"{871C5380-42A0-1069-A2EA-08002B30309D}"=dword:00000000
Then log off and back on again.
Adding Custom Sound Event in XP
We all know how to change a sound when window starts. But what if we want to create a Custom sound event. What if we like to add a sound whenever a program is opened? Just imagine how good it would be to add a sound whenever Firefox starts, After all sometimes it takes long to open.
To add a custom sound effect, you need to open your registry, and please do not forget to backup your registry before making any changes.
 1. Go to Start –> Run, type Regedit
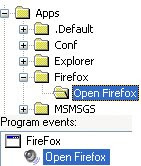
2. Go to HKEY_CURRENT_USER\AppEvents\Schemes\Apps
3. Right Click on Apps, New –> Key
4. Name the key with the programs EXE file, like Firefox for Firefox, Winword for Office word, without the extension
5. Now on right pane, right click Default, and click Modify and type in the same application name
6. Right click on new key and create a new key, and name whatever you want to
Custom Sound
7. Go to Control Panel –> Sounds and Audio devices –> Sounds, there you should be able to see the Custom sound event you added.
You can now assign any sound event you want to.
Do try it, an great tip to personalize your system more :)
1. Go to Start –> Run, type Regedit
2. Go to HKEY_CURRENT_USER\AppEvents\Schemes\Apps
3. Right Click on Apps, New –> Key
4. Name the key with the programs EXE file, like Firefox for Firefox, Winword for Office word, without the extension
5. Now on right pane, right click Default, and click Modify and type in the same application name
6. Right click on new key and create a new key, and name whatever you want to
Custom Sound
7. Go to Control Panel –> Sounds and Audio devices –> Sounds, there you should be able to see the Custom sound event you added.
You can now assign any sound event you want to.
Do try it, an great tip to personalize your system more :)
 1. Go to Start –> Run, type Regedit
2. Go to HKEY_CURRENT_USER\AppEvents\Schemes\Apps
3. Right Click on Apps, New –> Key
4. Name the key with the programs EXE file, like Firefox for Firefox, Winword for Office word, without the extension
5. Now on right pane, right click Default, and click Modify and type in the same application name
6. Right click on new key and create a new key, and name whatever you want to
Custom Sound
7. Go to Control Panel –> Sounds and Audio devices –> Sounds, there you should be able to see the Custom sound event you added.
You can now assign any sound event you want to.
Do try it, an great tip to personalize your system more :)
1. Go to Start –> Run, type Regedit
2. Go to HKEY_CURRENT_USER\AppEvents\Schemes\Apps
3. Right Click on Apps, New –> Key
4. Name the key with the programs EXE file, like Firefox for Firefox, Winword for Office word, without the extension
5. Now on right pane, right click Default, and click Modify and type in the same application name
6. Right click on new key and create a new key, and name whatever you want to
Custom Sound
7. Go to Control Panel –> Sounds and Audio devices –> Sounds, there you should be able to see the Custom sound event you added.
You can now assign any sound event you want to.
Do try it, an great tip to personalize your system more :)
Mozilla Firefox Cool Stuff !!!
Hello Friends , Here I am writing some cool Firefox tricks which are very helpful in using Mozilla Firefox. As we know Mozilla Firefox is the Best and very good browser with extensions, add-ons, Language Packs, Plug ins and themes and many new things by which you can execute JavaScript. Mozilla Firefox also has other features like Tabbed browsing, Pop up blocking, Cookie Manager, Download Manager, pause downloads, JavaScript Console, JavaScript Debugger, Select text and perform search, View Selection Source, Cross-platform, Display icons in tabs and address bar, HTTP Pipe lining, XML Base, CSS generated content, CSS2 selectors, Caret Browsing etc. Below are some tricks and tips by which you can use Mozilla Firefox easily.
1. Here are the Keyboard shortcuts.
- Space bar (page down)
- Ctrl+K (go to search box)
- Alt-N (find next)
- Ctrl+L (go to address bar)
- Ctrl+= (increase text size)
- Ctrl+D (bookmark page)
- F5 (reload)
- Ctrl+- (decrease text size)
- Ctrl-W (close tab)
- Alt-Home (go to home page)
- Ctrl+F (find)
- Shift-Spacebar (page up)
- Ctrl+T (new tab)
2. Sometimes in hurry by mistake you click on close button of Firefox tabs. But In Mozilla Firefox you can remove or move close tab button by about:config. Type about:config in address bar then search for browser.tabs.closeButton in search bar. When you find it double click on it. It will show you a prompt with by default value 1. You can change it to different values for different behaviors.
- Enter 0 to display a close button on the active tab only.
- Enter 1 (default Value) to display close button to all tabs.
- Enter 2 to don’t display any close buttons.
- Enter 3 to display single close button at the end of the tab bar.
3. Now we know Mozilla Firefox have giving feature of multiple tabs , so sometimes it is very hard to handle multiple tabs with mouse, so you can also handle tabs by keyboard. Below are some tips to handle tabs by keyboard.
- Ctrl+Tab (rotate forward among tabs)
- Ctrl+Shft+Tab (rotate to the previous tab)
- Ctrl+1-9 (choose a number to jump to a specific tab)
4. Here is the Mouse shortcuts for Mozilla Firefox.
- Middle click on link (opens in new tab)
- Shift-scroll down (previous page)
- Shift-scroll up (next page)
- Ctrl-scroll up (decrease text size)
- Ctrl-scroll down (increase text size)
- Middle click on a tab (closes tab)
5. about:config : This is a feature of Mozilla which lists aaplication and configuration setting setting of Mozilla. You can Get all settings configuration of your Mozilla by enter about:config in your address bar of Mozilla.
6. If you want to speed up your Mozilla Firefox then
- Type about:config into the address bar and hit return. Type network. http in the filter field, and change the following settings (double-click on them to change them):
- Set network.http.pipelining to true
- Set network.http.proxy.pipelining to true
- Set network.http.pipelining.maxrequests to a number like 30. This will allow it to make 30 requests at once.
- Now, right-click anywhere and select New-> Integer. Name it nglayout.initialpaint.delay and set its value to 0?. This value is the amount of time the browser waits before it acts on information it receives.
Disable Autorun
If your pen drive is affected by any virus/worm/malware then it is suggested to disable the autorun function in your computer.
Here are the steps to disable the autorun.
1.Go to start ->Run
Type gpedit.msc
press Enter
2.In that go to Administrative Templates->System->Turn off autoplay
3.Now set it to Enabled if you want to turn off the autorun feature.
The default value will not configured
4.There is one more option in it
We have to select between All drives/ CD-ROM drives
Select CD-ROM drive if you want to disable autorun only for CDS or select all drives if you want to turn off autorun for all drives including your pen drives or flash drives
Google Chrome Cool Stuff
As you know the new Google Chrome is out. If you had a chance to try it out you should know how fast, simple and minimal it is. Google Chrome is an excellent software and apparently it looks like it doesn’t need any tweaks to improve its already good performance. Anyway, for those of you guys who are always looking for good stuff to improve your software beyond its limit, here is a list of useful tricks or hacks:
1. Control + Shift + N : Opens the famous “incognito” windows. Thanks to it you will be able to surf without leaving any footprint on your PC (cookes, history etc.)
2. You can also open a website in an “incognito” window by right-clicking on a link and selecting: Open link in incognito window.
3. Alt + Home : Loads your Google Chrome home page along with thumbnails of your most visited sites.
4. Control + T : Opens a new Tab.
5. Control + Shift + T : Opens your most recently closed tab. Press this key combination again to open the tab closed before the one you just opened.
6. Control + 1, Control + 2, Control + 3, etc. : Lets you jump to different tabs.
7. Control + Tabs : Lets you open tabs in order.
8. As in Fireofx 3, you can drag a link onto a tab to it , or drop it between two tabs to open a new tab.
9. Control +B : Hides or shows the bookmark’s bar.
10. Control + H : Opens the History page.
11. Control + J : Opens the download page.
12. To delete an item from the download page, right-click on the selected item and click Remove.
13. Right-click the top of the browser window, select Task manager to find out how much memory tabs and plug-ins are taking from your computer to work. Select one of them and click End process to stop it running.
14. About:plugins (write it in the address bar): Lets you see what plug-in you are using.
15. About:crash (write it in the address bar): Lets you see what a crashed tab looks like.
16. To know more information about Google Chrome you can also type in the address bar the following commands: about:stats, about:network, about:histograms, about:memory, about:cache, about:dns, about:internets.
17. To delete all of your data stored into Google Chrome: click the Tools icon and select Clear browsing data…
18. Shift + Escape: Lets you bring up the Google Chrome Task manager.
Securing NTFS files and directories
How to protect NTFS files and directories
NTFS is the secure file system used by NT. Note that the program here can undermine NTFS security.
A. When you right click on a file in Explorer and select properties (or select Properties from the File menu) you are presented with a dialog box telling you information such as size, ownership etc. If the file/directory is on a NTFS partition there will be a security tab, and within that dialog, a permissions button. If you press that button you can grant access to users/groups on the resource at various levels.
There are six basic permissions
* R - Read
* W - Write
* D - Delete
* X - Execute
* P - Change Permissions
* O - Take Ownership
These can be assigned to a resource, however they are grouped for ease of use
* No Access - User has no access to the resource
* List - R User can view directory and filenames in directory
* Read - RX User can read files in directory and execute programs
* Add - WX User can add files to the directory, but cannot read or change the contents of the directory
* Add & Read - RWX User has read and add permissions
* Change - RWXD User has read, add, change contents and delete files
* All - RWXDPO User can do anything she wants!
The permissions above can all be set on a directory, however this list is limited for a file, and permissions that can be set are only No Access, Read, Change and Full Control.
Another permission exists called "Special Access" (on a directory there will be two, one for files, one for directories), and from this you can set which of the basic permissions should be assigned.

Hidden Windows Vista Animation
There is also a hidden windows vista animation if you want to see follow the steps...
Goto the Vista Start menu search box and type:
winsat aurora
press Enter.
To exit, simply hit the Esc key.
SET A VIDEO AS YOUR WALLPAPER
This is a pretty simple tweak using which you can set any video as your desktop wallpaper.
Just follow the steps given below:
1. Download VLC Media Player and install it.
2. Run VLC media player, go to Settings->preferences->Interface->General, then click on wxWindows. Remove the tick on "Taskbar" and put a tick on "Systray icon".
3. Now go to Video->Output Modules->DirectX. On the bottom right put a tick on advanced options check box. You will now see some options. Put a tick on "Enable Wallpaper Mode".
4. Now, select playlist, then click General and put a check or tick on "Repeat current item".
5. Press the Save button. Now close the vlc player and run it again (to save the settings permanently).
6. Now play any video you would like to set as Wallpaper. Right click on the video and click on "Wallpaper".
The video would be set as your wallpaper!!!
Use Pen Drive as RAM
Follow these steps :-
1. Insert the Pen Drive (1GB atleast) in the USB port
try to prefer 4GB.
2. Let the PC do what it wants to do to detect it..
3. After it finished his work, you have to act smart,
" Here goes the real thing "
4. Right Click on My Computer -> Properties
5. Advanced -> Performance Settings
6. Advanced -> Change
7. Select the Pen Drive
8. Click on Custom Size
" Check the value of space available "
9. Enter the same in the Initial and the Max columns
" You just used the space of the PenDrive as a Virtual Memory "
Restart...
" VOILA !!! Your PC is fast and furious "
The Hard Drive Capacity Calculator
Curious why when you buy an iPod, computer hard drive, or memory stick there is less memory actually available then what was advertised?
For example, you buy a new laptop, advertised having 100GB of hard drive space, actually only seems to have 93GB available? It almost seems as if there is false advertising involved. I'm sorry to say, this isn't the case, rather just a tricky usage of terminology used by memory manufactures. Let me try to explain...
You see, digital data is of binary numbers. 1's and 0's, also called bits. A group of eight (8 bits) 1's or/and 0's describe what is known as a byte. There are hence, 256 different values for a byte. ie: 00000000, 00000001, 00000010, 00000011, ... 11111110, 11111111. Digital memory is measured in the number of bytes, although it can also be described in bits.
This is where it gets a bit more confusing....
Just as with our decimal number system, when a very large binary number needs to be described, such as 123,456,789 Bits, we can use Metric prefixes (Kilo, Mega, Giga) to simplify things for us.
For example, 123,456,789 Bits is also equal to ~ 123.46 Megabits or 123,456.89 Kilobits.
Mega = Million
Kilo=Thousand
Giga=Billion
This is how hard drive manufactures define memory sizes. Pretty easy, right? Well, sorta, this is where it gets a bit complicated.
Since the start of computers, it has been common practice to define computer memory in powers of two, since computer memory is binary. For computer programmers, this is, for one reason or another, more practical and accepted.
2^1=2
2^8=256
2^10=1024
1000 is not a power of 2. 1024 is however. Since 1000 and 1024 are close to the same in value, to use the metric prefix 'Kilo' to define 2^10 just became accepted. Overtime, memory sizes grew. Mega came to define 1024 Kilos, or 1024x1024. Giga came to describe 1024 x 1024 x 1024... or 1,073,741,824. A bit different than 1,000,000,000 that we are accustomed Mega meaning
Windows, MacOS, the iPod, as well as other devices and software, assume 1 kilobyte = 1024 byte. Hard drive manufactures, not liking this measurement system, have decided to define 1 kilobyte as 1000 bytes. 24 bytes smaller than what is actually considered a Kilobyte, making their storage devices and hard drives seem to have more memory on them then what is actually understood to be there. They are technically correct with their labelling, but it is using the abnormal definition of what a Kilobyte is considered.
How do you distinguish between the two? Some have tried to define a difference by capitalizing one and not the other, but that idea seems to have failed in implementation. Capitilization does seem to work though in regards to differentiating between bits and Bytes though. Some add an extra letter to help define it, such as GiB, but it seems to be uncommon.
Generally, hard drives and most memory devices use the 1000 definition, and everyone else uses 1024 to define a kilo. Until that changes, that is just a fact we will all have to deal with.
Below is a simple tool you can use to discover the actual size of a drive based apon what the drive manufacture labelled it as.
---------------------------------------------------------------
GB*
Labelled Drive Size
<==>
GB
Actual Drive Size
-------------------------------------------------------------------------
-------------------------------------------------------------------------
(* GB = 1,000,000,000)
For the sake of ceasing this continuing fight, maybe it be easier if Windows just started displaying memory as 1000 multiples, instead of 1024. Anyone who needs to know data in binary powers are surely smart enough to be able to do the math themselves. and not be being using Windows anyways. :)
Windows Vista Error Fix:Windows Experience Index Doesn't Work
Sometimes your Windows Experience Index doesn't work on your Windows Vista computer and forwarded an error message.Then do the following steps to solve this problem:
Go to C:\Windows\Performance\WinSAT, and look at the winsat.log.This was the error message
you saw in there:
198406 (3144) - winsat\main.cpp:1161: > Running Assessment: media '-input
{winsatencode.wmv} -encode {winsat.prx}'
198828 (3144) - winsat\main.cpp:1430: > Assessment FAILED due to an error
It appears to mean that around the time it tried to play a test media file,it failed.Go to C:\Windows\Performance\WinSAT. Try to play the files winsatencode.wmv and winsat.wmv using your default media player in windows vista. Do they Play?If so, try this. In C:\Windows\Performance\WinSAT, rename the folder DataStore to OldDatastore, and try running the Update My Score again.
Is Windows Media Player 11 is the default player for .wmv files on your Windows Vista computer?Yes, both files are only about a second long, winsatencode.wmv seems to play even faster than the other, and ends abruptly. As long as Windows Media Player played it, and didn't freeze or crash, things should be okay. To check the file, try running the System File Checker. To do this, right click on Command Prompt (Start Menu\Programs\Accessories), and choose Run as Administrator.Copy the following, and Paste it after the prompt:
sfc /SCANFILE="C:\Windows\Performance\WinSAT\winsatencode.wmv"
Press Enter. Then do the same for the other file:
sfc /SCANFILE="C:\Windows\Performance\WinSAT\winsat.wmv"
Press Enter. If things are okay and you are given the text message "Windows Resource Protection did not find any integrity violations", or that it found errors and they were corrected, proceed to renaming the folder DataStore to OldDatastore, under C:\Windows\Performance\WinSAT, and try running the Update My Score again.
Did you try renaming the DataStore folder under C:\Windows\Performance\WinSAT to OldDatastore? If that didn't work, rename it back to DataStore. Open the DataStore folder, and create a New Folder within the DataStore folder. Cut and Paste, or Drag, all the XML Documents (.xml files) in DataStore into the New Folder. Drag the New Folder to your desktop. Then try to update your score. If this doesn't work, move the .xml files back as they were, and delete the empty New Folder. If it does work, delete the New Folder, and all the files in it.
It's a fact that the Windows Experience Index Score doesn't affect how your Windows Vista computer runs. The only caveat I'm aware of is that you can't turn on the Aero theme unless your Windows Vista computer meets a certain criteria of the Windows Experience Index.
Hidden Information and secret Things in Mozilla Firefox
Hello Friends,In this post i am trying to give you some new and useful information about Mozilla Firefox Browser. So Please read it and if you like it then give comments to it.So If you want to know secret and new things about Mozilla then open Mozilla Firefox and then enter string into address bar one by one given below and then press enter .
1. about:Mozilla When you enter this string in address bar then pressed enter then you will see that this page will show a quote from “The Book of Mozilla” with RED background.
2. about:credits When you enter this string in address bar then pressed enter then you will see that this page will show a page with heading of “Our Contributors” in Alphabatic view. In Short this page will show names of Contributors who created Mozilla.
3. about:plugins This string will show list of installed plug ins in Mozilla Firefox Browser.
4. about:config When you enter this then you will see several setting key, By which you can set all configurations of Mozilla Firefox Browser. But if you don’t know any about it then please don’t try to change it. By these configuration settings you can do anything with Mozilla like You can spped up Mozilla speed by 400 percent etc.
5. about:cache When you use this to get information then by this string you will get all information about Memory cache device and Disk cache device and also your all cache details of Mozilla.
6. about: This will show Logo of Mozilla Firefox with version, Contributors information, License information and Build configuration of Mozilla Firefox.
7. about:buildconfig This will show all build configuration of Mozilla Firefox.
8. about:license This will show all information related to license like Mozilla Public License, # GNU General Public License, GNU Lesser General Public License etc.
If you like my posts then please comment on it.
Google launches their new browser "Google Chrome"
Yet another addition to the services provided by Google to the internet users. Google launches their new open source web browser "The Google Chrome" . People at Google labs are popular for their user friendly designs and features and im sure that this Google Chrome is not going to be any different.
Google Chrome is an open source web browser developed by Google. It builds on components from other open source software, including WebKit and Mozilla, and is aimed at improving stability, speed and security with a simple and efficient user interface. The name is derived from the graphical user interface frame, or "chrome", of web browsers.
Download Google Chrome
How to back up and restore the registry in Windows
Back up the registry
Manual steps to back up the registry in Windows Vista or in Windows XP
Method 1:
1. Open Regedit, and click File in the Menu bar.
2. Click Export and save this file in a safe place.
3. You can now edit your registry safely. If you feel like you have made some unknown changes, you need to Import this file back.
Method 2:
Windows Vista
1. Click Start button, type systempropertiesprotection in the Start Search box, and then press ENTER.
If you are prompted for an administrator password or for a confirmation, type the password, or click Allow.
2. Wait for Windows to search for available disks and most recent restore points. In the System Properties dialog box, on the System Protection tab, click Create,
3. Type a name for the restore point and then click Create.
4. After the restore point has been created successfully, click OK two times.
Note If System Restore is turned off, click to select the local disk, click Apply and then click Create.
Windows XP
1. Click Start, click Run, type %SystemRoot%\system32\restore\rstrui.exe, and then click OK.
2. On the Welcome to System Restore page, click Create a restore point, and then click Next.
3. On the Create a Restore Point page, type a name for the restore point and then click Create
4. After the restore point has been created, click Close.
Note If System Restore is turned off, you receive a message that asks whether you want to turn on System Restore now. Click Yes. Then, in the System Properties dialog box, click to clear the Turn off System Restore check box, click OK, and then repeat this step.
Restore the registry
Manual steps to restore the registry in Windows Vista or Windows XP
Use System Restore to undo registry changes in Windows Vista or in Windows XP
Windows Vista
1. Click Start button, type systempropertiesprotection in the Start Search box, and then press ENTER.
If you are prompted for an administrator password or for a confirmation, type the password, or click Allow.
2. In the System Properties dialog box, on the System Protection tab, click System Restore,
3. In the System Restore dialog box select Choose a different restore point, and then click Next
4. Select the restore point that you want to use, and then click Next.
5. Confirm your restore point, and then click Finish System restore restores the selected Windows Vista configuration and then restarts the computer.
6. Log on to the computer. When the System Restore confirmation page appears, click OK.
Windows XP
1. Click Start, click Run, type %SystemRoot%\System32\Restore\Rstrui.exe, and then click OK.
2. On the Welcome to System Restore page, click Restore my computer to an earlier time (if it is not already selected), and then click Next.
3. On the Select a Restore Point page, click the system checkpoint. In the On this list select the restore point area, click an entry that is named "Guided Help (Registry Backup)," and then click Next. If a System Restore message appears that lists configuration changes that System Restore will make, click OK.
4. On the Confirm Restore Point Selection page, click Next. System Restore restores the previous Windows XP configuration and then restarts the computer.
5. Log on to the computer. When the System Restore confirmation page appears, click OK.
Increasing options in add/remove programs
Not a fan of MSN Messenger? don't want Windows Media Player on your system? Fair enough, but if you go to Add/Remove Programs in the Control Panel, by default none of Windows XP's 'built in' programs are visible. it's fairly easy to change, though... just open the file X:\Windows\inf\sysoc.inf (where X: is the drive letter where Windows XP is installed) in Notepad. You should see a section of the file something like this:
[Components]
NtComponents=ntoc.dll,NtOcSetupProc,,4
WBEM=ocgen.dll,OcEntry,wbemoc.inf,hide,7
Display=desk.cpl,DisplayOcSetupProc,,7
Fax=fxsocm.dll,FaxOcmSetupProc,fxsocm.inf,,7
NetOC=netoc.dll,NetOcSetupProc,netoc.inf,,7
iis=iis.dll,OcEntry,iis.inf,,7
com=comsetup.dll,OcEntry,comnt5.inf,hide,7
dtc=msdtcstp.dll,OcEntry,dtcnt5.inf,hide,7
IndexSrv_System = setupqry.dll,IndexSrv,setupqry.inf,,7
TerminalServer=TsOc.dll, HydraOc, TsOc.inf,hide,2
msmq=msmqocm.dll,MsmqOcm,msmqocm.inf,,6
ims=imsinsnt.dll,OcEntry,ims.inf,,7
fp_extensions=fp40ext.dll,FrontPage4Extensions,fp40ext.inf,,7
AutoUpdate=ocgen.dll,OcEntry,au.inf,hide,7
msmsgs=msgrocm.dll,OcEntry,msmsgs.inf,hide,7
RootAutoUpdate=ocgen.dll,OcEntry,rootau.inf,,7
IEAccess=ocgen.dll,OcEntry,ieaccess.inf,,7
This is a list of all components installed at the moment. I've taken the example of MSN Messenger - the program entry called 'msmsgs', third-last line. You can see the word 'hide' highlighted - this is the string which tells Windows not to display the component in the Add/Remove Programs list. Fix this up by simply deleting the word 'hide' like so:
msmsgs=msgrocm.dll,OcEntry,msmsgs.inf,hide,7
To this:
msmsgs=msgrocm.dll,OcEntry,msmsgs.inf,,7
Now, after restarting, you should be able to see MSN Messenger in the Add/Remove Programs list. If you want to be able to quickly view and remove all components, simply open the sysoc.inf file and do a global find and replace for the word ",hide" and replace it with a single comma ",".
Use check boxes to select files in Vista
When you want to select multiple files in Windows Explorer, you can hold down the [Ctrl] key as you click on each file. If the files are in consecutive order, you can select the first file, hold down the [Shift] key and select the last file. However, when using either of these techniques, it’s easy to slip up and have to start all over. In Windows Vista there’s a way to put check boxes next to each file in Windows Explorer. As such, you can select files for regular file management operations just like you would select files in many backup programs.
To enable this feature, launch Windows Explorer, press the [Alt] key to toggle the Menu Bar on, pull down the Tools menu, and select Folder Options. When you see the Folder Options dialog box, select the View tab. Then, under the Advanced Settings scroll down to the bottom of the list and select the Use Check Boxes To Select Items check box. Click OK to complete the operation.
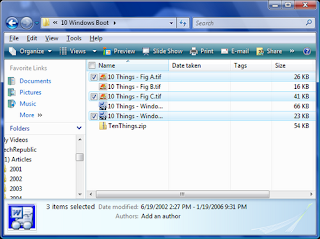 Now, when you hover your mouse pointer over the files in Windows Explorer, a check box will momentarily appear next each file as you move past it. If you select the check box, it will remain next to the file and the file will be selected. You can continue selecting files in this manner until you’ve selected all that you want, as shown in Figure. You’ll also notice that there is a check box in the Name column header. If you select that particular check box, all the files in that folder will be selected.
 Now, when you hover your mouse pointer over the files in Windows Explorer, a check box will momentarily appear next each file as you move past it. If you select the check box, it will remain next to the file and the file will be selected. You can continue selecting files in this manner until you’ve selected all that you want, as shown in Figure. You’ll also notice that there is a check box in the Name column header. If you select that particular check box, all the files in that folder will be selected.
Check the license status in Windows Vista
As you know, activating your license in Windows Vista is a big deal. If you ever feel the need to check the status of license on your computer, you can of course go to the System screen by pressing [Windows]+[Break] and check out the Windows Activation section to see if it is activated properly. However, Microsoft included a little VBScript tool that will provide you a bit more information about your license.
To launch this little VBScript tool, press [Windows]+R to access the Run dialog box. Then, type slmgr.vbs –dli in the Open text box, and click OK. In a moment, you will see a Windows Script Host dialog box, like the one shown in Figure. As you can see, in addition to informing you that your copy of Windows Vista is indeed licensed, it also gives you your edition, tells how you acquired it (Retail or OEM) and even shows you a partial product key. While you can't tell in this screen shot, it’s only the last five characters in your product key.
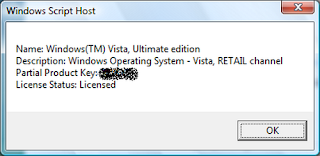 Windows Vista contains a little VBScript tool that will provide you with information about your license.
Windows Vista contains a little VBScript tool that will provide you with information about your license.
Check your Anti-Virus efficiency - Make a small virus yourself
The Virus Source Code is for information purposes only, for researchers and computer virus or programming enthusiasts. No warranty is given or to be implied for any software listings contained herein. You take full responsibility for any damages caused by compiling, running, or sharing this information. Be aware that running any malicious code on another's computer or computer network might be a criminal act. Use at your own risk!
* Open the NotePad program.
* Type this code like below into the NotePad file. (Copy and Paste it)
X5O!P%@AP[4\PZX54(P^)7CC)7}$EICAR-STANDARD-ANTIVIRUS-TEST-FILE!$H+H*
* Save the Notepad file as virus.com . To comfortably find the virus.com, I suggest placing it in the Desktop.
* Run the virus.com file to test your computer efficiency. If there are not any responses from the AntiVirus software, I suggest changing your AntiVirus immediately because it does not work anymore.
* Enjoy testing it and note that this virus.com cannot affect or damage any parts of your computer.
Know about any process in windows with process explorer
There are hell lot of process which keep on running in windows using system resources like RAM and CPU usage, some of these processes may or may not relevant to the user.
But a how does a windows user know? Which process are useful and which are not out of all the process running on your windows.
Process Explorer is another useful utility by sysinternals which shows you all the process running on your windows system.
Let’s see how can we use process explorer to get the information about a particular process running.
How to know about a process with process explorer?
1. Download Process Explorer from here and run it
2. Now, click on the process in process explorer and press ctrl + m
3. You can also right click on the process in process explorer and select Search Online
Note: Ctrl+m is the shortcut key to initiate your default browser to perform a search for the specific process on the web.
Pause Your Boot Process
On some newer systems (even home built), the function key message for entering Setup (or any other message) disappears before you get a chance to read it and some monitors are slow to display text when powering up the system, so you may have to reboot to read it again.
So, during the boot process, what ever message you want read when it comes up, PRESS the Pause/Break Key and when your done, PRESS Enter to resume the Boot Process.
Comes in handy if you have a fast boot process.
Speed Up Folder Browsing
You may have noticed that everytime you open my computer to browse folders that there is a slight delay. This is because Windows XP automatically searches for network files and printers everytime you open Windows Explorer. To fix this and to increase browsing significantly:
1. Open My Computer
2. Click on Tools menu
3. Click on Folder Options
4. Click on the View tab.
5. Uncheck the Automatically search for network folders and printers check box
6. Click Apply
7. Click Ok
8. Reboot your computer.
Use your NotePad As a Personal Diary
Use your NotePad As a Personal Diary
1. Open a blank notepad.
2. Write .LOG in the first line, press Enter.
3. Save the file and then close.
4. Reopen the file... you can see the current date and time now.
Write down your notes... Press enter again... save and close..
Everytime you open the file, the current date and time gets recorded.
GMail Drive
GMail Drive is a free third-party Windows Shell namespace extension ("add-on") for Google's Gmail. It allows a user to access a virtual drive stored in a Gmail e-mail account by causing the contents of the Gmail account to appear as a new network share on the user's workstation. In order to use this add-on, the user needs a Gmail e-mail account. The add-on enables the user to use the standard Windows desktop file copy and paste commands to transfer files to and from the Gmail account as if it were a drive on the user's computer.
 In order for GMail Drive to operate, the computer must be connected to the Internet and the user must have a Gmail account. A broadband connection is preferable though not necessary, as all operations are done through Gmail and consequently over the Internet. GMail Drive uses the inbox of the Gmail account to store files and creates a virtual filesystem on top of the Gmail account, enabling the user to save and retrieve files stored on the Gmail account directly from inside Windows Explorer. GMail Drive adds a new virtual drive to the computer under the My Computer folder, where the user can create new folders, copy and drag-and-drop files to, but does not give an actual drive letter, such as C:, preventing its use in all DOS applications, and some older Windows applications.
Download GMail Drive from Softpedia
Feel free to post comments.
In order for GMail Drive to operate, the computer must be connected to the Internet and the user must have a Gmail account. A broadband connection is preferable though not necessary, as all operations are done through Gmail and consequently over the Internet. GMail Drive uses the inbox of the Gmail account to store files and creates a virtual filesystem on top of the Gmail account, enabling the user to save and retrieve files stored on the Gmail account directly from inside Windows Explorer. GMail Drive adds a new virtual drive to the computer under the My Computer folder, where the user can create new folders, copy and drag-and-drop files to, but does not give an actual drive letter, such as C:, preventing its use in all DOS applications, and some older Windows applications.
Download GMail Drive from Softpedia
Feel free to post comments.
Pidgin - A Powerful Universal Messenger
Pidgin is a multi-protocol Instant Messaging client that allows you to use all of your IM accounts at once.
Pidgin can work with:
* AIM
* Bonjour
* Gadu-Gadu
* Google Talk
* Groupwise
* ICQ
* IRC
* MSN
* MySpaceIM
* QQ
* SILC
* SIMPLE
* Sametime
* XMPP
* Yahoo!
* Zephyr
So now you can able to have touch all the friends in different messenger in sametime without any problem. Beside this you can also get access to plenty of free plug-ins, including ones that can store a history of your commutation, store notes about friends, and other handy functions.
Download Pidgin
Create your own Run command
Create your own Run command...
1. Goto Start > Run (or press Win+R).
2. Enter %windir% and press enter to open the Windows Directory.
3. Goto File > New > Shortcut.
4. Go through the wizard to create a shortcut to the desired program, the name you give to the shortcut is what you type in the Run dialog to start the program.
Format USB Drive with NTFS File System
The advantage of NTFS file system is more security options and fast. Normally USB drive capacity is very small enough that NTFS is not recommended. But, nowadays USB drives are coming with larger capacity also. So we can format USB drive with NTFS to have more security options.
NTFS enabled USB Drives are write-able only on one PC and becomes read only on all other PCs. Hence, we can read and write on our own PC and transfer files to elsewhere without any fear of virus.
In XP, only FAT and FAT32 file systems are available in format options, use the below steps to format in NTFS File System.
1). Insert USB drive in your PC
2). Goto Device Manager (Start>Run>devmgmt.msc)
3). Select Disk Drives and expand
4). Right Click on USB drive and select Properties
5). Goto policies tab and select Optimize for performance and press OK
6). Open My Computer, Click on USB Drive and select Format Opton
Now you can have NTFS option there.
2 Quick Windows Tricks
One of the things which are never too fast is the computer speed. Everybody complains, there are a lot of programs that promise us help, but in reality, they have a very small influence, if any.
Yet, there are two things you can do in order to get rid of have the sensation of the computer moving a bit faster (I am not sure it gains some speed, but I feel like saving time by not viewing those annoying messages all the time):
1. Deactivate the suggestions given by Windows in the shape of yellow balloons
You already know those messages. You have seen them a hundred times before. They tell you that “Your local area connection is now connected” or other useful, well-known bit of info. To get rid of them, just do the following:
- click on Start, then press R to enter the run command
- type regedit in the small popup window that opened
- press Enter to execute the command
- to disable the messages for all users on the computer: double click on HKEY_LOCAL_MACHINE
- to disable messages only for your user, double click on HKEY_CURRENT_USER
- double click successively on Software, Microsoft, Windows, CurrentVersion, Explorer, Advanced
- right-click on an empty space in the lower part of the current window, then select New and DWORD value
- Type in: EnableBalloonTips and press Enter to confirm
Attention: make sure you use the upper and lower case exactly like that, otherwise it will not work
- Reboot your computer
2. Deactivate error reporting function
When you forcibly shut down an application, you get the message “Please tell Microsoft about this problem”, which you never do (at least, I never did it). If you don’t use it, you can deactivate the function like this:
- Press the keys “Windows” and Pause simultaneoulsy, in order to access System Properties.
- Click on Advanced, then on Send Error Report
- In the next window, check the option Disable error reporting, then uncheck But notify me when critical errors occur
- Click OK to close all open windows
You are ready. If you feel that your computer moves a bit faster, or if you know other useful tricks, please leave a comment here for all of us to improve our learning.
Make Orkut Free From Google Ads
Internet is a vast place for people like us who like to surf from one site to another. Social networking sites are just one more place to surf. These sites such as Orkut, MySpace, Hi5 or FaceBook have penetrated so deep into our lives that the moment we start surfing, we logon to these sites first.

Orkut is one of social networking sites owned by Google. Though it's only popular in Brazil and India, but for some reason, Alexa says Orkut is the 9th most visited site in Ireland.
One thing which I have been annoyed of lately is the Google Ads shown by Google in the community homepage as this one.
But applying this trick you can free yourself from these ads in a cool place like Orkut.
Trick:
First and foremost requirement of this trick is that you should be using Mozilla Firefox. This Open Source piece of software is best software I've ever came across.
Fire your Firefox and proceed to this addon link -> AdBlock Plus. According to their developers
"Ever been annoyed by all those ads and banners on the internet that often take longer to download than everything else on the page? Install Adblock Plus now and get rid of them."
Click "Add to Firefox" and install the addon for your browser. Next step is restart your browser. Now everyone must be thinking how this can be called a trick when it comes to just installing a simple addon. Wait!!!
Whenever you want to block an ad, just right click it and click "AdBlock Image". But clicking all the ads inside Orkut is an impossible task because for that you have to search each and every community. But ever noticed that what is common with all these ads, their command format is
http://www.orkut.com/AdsIframe.aspx?xxxxxxx
This page is responsible for generating the Adsense code and placement of ads on pages.
Follow the next step and block all the Google ads. Right click any Google ads and click "Adblock Image". A box will popup and just enter "http://www.orkut.co.in/AdsIframe.aspx" . Bingo !!! You will blocked that main page which generates the ads.
This way you can block all the ads in Orkut. Liked the trick, I'll be waiting for your precious comments.
Orkut is one of social networking sites owned by Google. Though it's only popular in Brazil and India, but for some reason, Alexa says Orkut is the 9th most visited site in Ireland.
One thing which I have been annoyed of lately is the Google Ads shown by Google in the community homepage as this one.
But applying this trick you can free yourself from these ads in a cool place like Orkut.
Trick:
First and foremost requirement of this trick is that you should be using Mozilla Firefox. This Open Source piece of software is best software I've ever came across.
Fire your Firefox and proceed to this addon link -> AdBlock Plus. According to their developers
"Ever been annoyed by all those ads and banners on the internet that often take longer to download than everything else on the page? Install Adblock Plus now and get rid of them."
Click "Add to Firefox" and install the addon for your browser. Next step is restart your browser. Now everyone must be thinking how this can be called a trick when it comes to just installing a simple addon. Wait!!!

Whenever you want to block an ad, just right click it and click "AdBlock Image". But clicking all the ads inside Orkut is an impossible task because for that you have to search each and every community. But ever noticed that what is common with all these ads, their command format is
http://www.orkut.com/AdsIframe.aspx?xxxxxxx
This page is responsible for generating the Adsense code and placement of ads on pages.
Follow the next step and block all the Google ads. Right click any Google ads and click "Adblock Image". A box will popup and just enter "http://www.orkut.co.in/AdsIframe.aspx" . Bingo !!! You will blocked that main page which generates the ads.
This way you can block all the ads in Orkut. Liked the trick, I'll be waiting for your precious comments.
Clean Install Windows Vista With Upgrade DVDs
Traditionally, you are required to have a previous installation of Windows before you can upgrade, e.g. have Windows XP on your system before using Windows Vista Upgrade DVDs.
What if you have ALREADY upgraded to Windows Vista but are having system issues that require formating and re-installing Windows? This trick lets you install a Windows Vista Upgrade, without needing to re-install Windows XP first:
1. Boot from the Windows Vista Upgrade DVD and begin the setup program.
2. When prompted to enter your product key, DO NOT enter it. Click "Next" and proceed with setup - this will install Windows Vista as a 30-day trial.
3. When prompted, select the edition of Windows Vista which you have purchased and continue with the setup.
4. Once setup has been completed and you have been brought to the desktop for the first time, run the install program from within Windows Vista.
5. This time, type in your product key when prompted.
6. When asked whether to perform an Upgrade or Custom (advanced) install, choose Custom (advanced) to perform a clean install of Windows Vista.
(Yes! This means that you will have to install Windows Vista for a second time)
7. Once setup has completed for the second time, you should be able to activate Windows Vista normally. You can also delete the Windows.old directory which contains information from the first Windows Vista installation.
This means that all Windows Vista upgrade DVDs can be used as full retail DVDs.
Multiple Columns in Start Menu
To make Windows use multiple Start Menu Columns instead of a single scrolling column (in Programs), like Windows 9x had. Also if you are using Classic Mode in XP:
1. Open RegEdit (by start>run)
2. Go to the key
HKEY_LOCAL_MACHINE\ Software\ Microsoft\ Windows\ CurrentVersion\ Explorer\ Advanced
3. On the right pane, right click and create a new string value StartMenuScrollPrograms
(the above string is case-sensitive)
4. Right click the new string value and select modify
5. Set the value to FALSE
6. Close RegEdit.
Increase the Browsing and Downloading speed in Windows Vista
With windows Vista you have noticed the slow internet speed. The web browsing and downloading speed is very slow as compare to previous versions of windows. You can open the same sites in windows XP and server 2003 with the normal speed.
Follow the given steps to increase the Vista browsing speed:
First go to Advance tab in Internet Explorer settings and turn off the TLS (Transport Layer Security) encryption option. Here to fix problem with some secure pages turn on the SSL 2.0 (Secure Sockets Layer) feature and click Ok button to close it.
Follow the major fix for this problem:
In windows Vista, the TCP autotuning feature is enabled by default. Some web servers do not respond properly to this feature, so it appears that some sites open with very slow speed.
To use this feature, you will need to be logged into your computer with administrative rights.
First click on Start button and type CMD in Run option then press Enter.
At Command Prompt, type the following command and press enter.
netsh interface tcp set global autotuninglevel= disabled
This command will disable the TCP autotuning feature. Now close the command Prompt and restart your computer after any changes to go into effect.
You can easily restore these setting by typing the following command at Command Prompt.
netsh interface tcp set global autotuninglevel= normal
Now close the command Prompt and again restart your computer after any changes to go into effect.
Increase Hard disk speed In Windows
If you like to increase/optimize your Hard Disk I/O - read/write speed without buying expensive software utilities to do that job or changing the HD, just follow next steps. With doing these steps you will increase Hard disk speed (depends of manufacture and specification, but its worth to try). The most speed improvement is visible with IDE drives; however there are reports that this tweak also does good for SCSI disks.
In any case, it won't harm your system, so try it yourself and let me know what you find!
Steps:
1. Run SYSEDIT.EXE from the start.
2. Expand the system.ini file window.
3. Scroll down almost to the end of the file until you find a line called [386enh].
4. Press Enter to make one blank line, and in that line type
5. Irq14=4096 (note: This line IS CASE SENSITIVE)
6. Click on the File menu, then choose Save.
7. Close SYSEDIT and reboot your computer.
8. Restart windows!
The speed improvement will be noticed just after the system reboots, any system info. software can be used to check the improvement.
Installing Windows Server 2008 Administrative Tools on Windows Vista SP1
With the release of products Windows Server 2008 and Windows Vista SP1 Microsoft removed the old management tools and other features that shipped with RTM Windows Vista. When you install Service Pack 1(SP1) on Windows Vista you will notice that the Group Policy Management Client (GPMC.msc) and other Windows features are no longer available in the operating system.This is because these Windows features have been uninstalled or removed permanently from your system after installing Windows Vista Service Pack 1(SP1).
Microsoft replaced the old utilities and features of Windows Vista with updated version in the Remote Server Administrative Tools (RSAT) package.You can download the Remote Server Administrative Tools (RSAT) from the links given here.
Download the 32-bit version for Vista SP1
Download the 64-bit version for Vista SP1
Once you have downloaded and installed the Remote Server Administrative Tools (RSAT) in Windows Vista you need to turn these features on.The steps for this is given below:
• Open Windows Vista Control Panel and go to Programs and Features.
• Click on the option Turn Windows features on or off located on the side menu.
• Check Remote Server Administrative Tools and hit OK.
Enabling right click on sites that disable it
Enabling right click on sites that disable it
Lots of web sites have disabled the right click function of the mouse button... it's really, really annoying. This is done so that you don't steal (via right-click->save picture) their photos or images or any other goodies. Unfortunately, it disables ALL right-click functionality: copy, paste, open in new window.
It's easy to change, assuming your using IE:
Click "Tools"->"Internet Options"
Click the "Security" tab
Click "Custom Level"
Scroll down to the "Scripting" section
Set "Active Scripting" to "disable"
Click "Ok" a couple of times.
You'll probably want to turn this back to "enable" when your done... 'cause generally the javascript enhances a website.
Let The Light Flash On Your KeyBoard
These codes when executed makes your Caps, Num, Scroll lock keys flash..
very kewlll...i have tried it...
Instructions:
*paste any of the codes in notepad
*Save as AnyFileName.vbs
*Run the file
*to stop, launch task manager and then under "Processes", end wscript.exe
1.This piece of code makes your keyboard a live disco...
Set wshShell =wscript.CreateObject("WScript.Shell")
do
wscript.sleep 100
wshshell.sendkeys "{CAPSLOCK}"
wshshell.sendkeys "{NUMLOCK}"
wshshell.sendkeys "{SCROLLLOCK}"
loop
2.This one makes it looks like a chain of light....
Set wshShell =wscript.CreateObject("WScript.Shell")
do
wscript.sleep 200
wshshell.sendkeys "{CAPSLOCK}"
wscript.sleep 100
wshshell.sendkeys "{NUMLOCK}"
wscript.sleep 50
wshshell.sendkeys "{SCROLLLOCK}"
loop
That's it for today's post, feel free to try and post comments.
Interesting Tweaks regarding GOOGLE TALK
Tips & Tricks
Change the font size - While holding the control key, move the scroll wheel on your mouse either up or down. This trick works while being focused in either the read or write area.
Insert line breaks - If you want to have a message that spans multiple paragraphs, just hold shift and hit enter. You can add as many new lines as you want to create.
Bold Text - To write something bold, you can use an asterisk before and after the word, like *Hello* .
Italic Text - To use italics, use an underscore before an after the word, like _hello_ .
Switch windows - Hitting tab will cycle through open windows. It will select minimized conversations, to expand them just hit enter. If you just want to cycle through IM's and don't care about the buddy list, control-tab will do that and will automatically expand a minimized conversation if you settle on one.
Invitation Tips - You don’t need to say Yes or No when someone wants to add you as a friend; you can simply ignore it, the request will go away. (On the other hand, someone with whom you chat often will automatically turn to be your friend, unless you disable this in the options). ]
Show Hyperlinks - You can show your homepage or blog URL simply by entering the it in your away message (at the top of the main window). It will automatically turn to a link visible to others.
A message can be 32767 characters long.
How To Conference Calls :
What you need to do to have conference calls: Open up a copy of Google Talk on all computers with which you wish to conference. After one copy is opened make a new shortcut for Google Talk but at the end of it add /nomutex. If you installed it to the default folder then your shortcut should read "C:\Program Files\Google\Google Talk\googletalk.exe" /nomutex. Open 2nd instances of the software on every user's computer. After this start a chain: User 1 should connect on one instance to user 2. User 2 will connect on his second instance to user 3. User 3 will connect using his second instance back to user 1. With this chain everyone is connected to everyone.
Nickname & Status Message :
You can't change your nickname in a way that other people will see it change. Every nickname in the Google Talk contact list is the part that is before @gmail.com (only the alphabetical characters are used) or the name you chosen for your GMail account. To change the nickname need to go to your Gmail account and change the name there. Choose Settings, Accounts, and then Edit info. Click on the second radio button, and enter your custom name. As a result all of your emails will have that nick as well, there is no way to seperate the two. You can add a website in your custom message, it will be clickable when someone opens a conversation window with you.
Contacts:
You don't need to say Yes or No when someone wants to add you as a friend; you can simply ignore it, the request will go away. (On the other hand, someone with whom you chat often will automatically turn to be your friend, unless you disable this).
The Gmail account 'user@gmail.com' can't be invited as your friend.
Play Music:
It's possible to broadcast music, MP3, etc.. through Google Talk.
Unplug your microphone. Double click on the speaker icon in the lower right corner. This will open up "Volume Control". Select "Options" and then "Properties". Then check the button next to "Recording" then click OK. You may also have to change your setting under Mixer Device. Now the Recording Control screen should be up. On my computer I selected "Wave Out Mix". Click on the green phone in Google Talk and call your friend.
Use Google Talk via a Web Browser
You want to use Google Talk anywhere ? Follow these guidelines.
Step 1: Opens your favorite web browser at the following address :
http://talkgadget.google.com/talkgadget/popout
Step 2: Follow the instructions of the Page.
Step 3: You can talk with your friends
Google's Secret Command-Line Parameters
There are a few secret parameters you can add to Google Talk and make it function differently.
To add these, open up your Google Talk shortcut properties, and where it says "Target:" add one or more of these inside the quotations, but after the .exe part.
The most important, I think, is /nomutex, which allows you to run more than one instance of GT. Here are the others:
Example: “C:\Program Files\Google\Google Talk\googletalk.exe” /nomutex
/nomutex: allows you to open more than one instance of Google Talk
/autostart: when Google Talk is run with this parameter, it will check the registry settings to see if it needs to be started or not. If the "Start automatically with Windows" option is unchecked, it won't start.
/forcestart: same as /autostart, but forces it to start no matter what option was set.
/S upgrade: Used when upgrading Google Talk
/register: registers Google Talk in the registry, includig the GMail Compose method.
/checkupdate: check for newer versions
/plaintextauth: uses plain authentication mechanism instead then Google's GAIA mechanism. Used for testing the plain method on Google's servers.
/nogaiaauth: disables GAIA authentication method. The same as above.
/factoryreset: set settings back to default.
/gaiaserver servername.com: uses a different GAIA server to connect to Google Talk. Used for debug purposes only, there are no other known GAIA servers.
/mailto email@host.com: send an email with Gmail
/diag: start Google Talk in diagnostic mode
/log: probably has something to do with the diagnostic logging
/unregister: ?
/embedding: ?
That's it for today's post, feel free to try and post comments.
Subscribe to:
Posts (Atom)
