 Now, when you hover your mouse pointer over the files in Windows Explorer, a check box will momentarily appear next each file as you move past it. If you select the check box, it will remain next to the file and the file will be selected. You can continue selecting files in this manner until you’ve selected all that you want, as shown in Figure. You’ll also notice that there is a check box in the Name column header. If you select that particular check box, all the files in that folder will be selected.
Use check boxes to select files in Vista
When you want to select multiple files in Windows Explorer, you can hold down the [Ctrl] key as you click on each file. If the files are in consecutive order, you can select the first file, hold down the [Shift] key and select the last file. However, when using either of these techniques, it’s easy to slip up and have to start all over. In Windows Vista there’s a way to put check boxes next to each file in Windows Explorer. As such, you can select files for regular file management operations just like you would select files in many backup programs.
To enable this feature, launch Windows Explorer, press the [Alt] key to toggle the Menu Bar on, pull down the Tools menu, and select Folder Options. When you see the Folder Options dialog box, select the View tab. Then, under the Advanced Settings scroll down to the bottom of the list and select the Use Check Boxes To Select Items check box. Click OK to complete the operation.
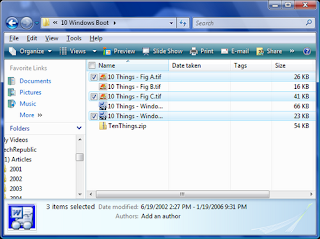 Now, when you hover your mouse pointer over the files in Windows Explorer, a check box will momentarily appear next each file as you move past it. If you select the check box, it will remain next to the file and the file will be selected. You can continue selecting files in this manner until you’ve selected all that you want, as shown in Figure. You’ll also notice that there is a check box in the Name column header. If you select that particular check box, all the files in that folder will be selected.
Now, when you hover your mouse pointer over the files in Windows Explorer, a check box will momentarily appear next each file as you move past it. If you select the check box, it will remain next to the file and the file will be selected. You can continue selecting files in this manner until you’ve selected all that you want, as shown in Figure. You’ll also notice that there is a check box in the Name column header. If you select that particular check box, all the files in that folder will be selected.
Subscribe to:
Post Comments (Atom)

0 comments:
Post a Comment