Google Search Techniques
Link: url Shows other pages with links to that url
Related:url same as "what's related" on serps.
Site: domain restricts search results to the given domain.
Allinurl: shows only pages with all terms in the url.
Inurl: like allinurl, but only for the next query word.
Allintitle: shows only results with terms in title.
Intitle: similar to allintitle, but only for the next word.
"intitle:webmasterworld google" finds only pages with Webmasterworld in the title, and google anywhere on the page
Cache:url will show the Google version of the passed url.
Info:url will show a page containing links to related searches, backlinks, and pages containing the url. This is the same as typing the url into the search box.
Spell: will spell check your query and search for it.
Stocks: will lookup the search query in a stock index.
Filetype: will restrict searches to that filetype. "-filetype:doc" to remove Microsoft word files.
Daterange: is supported in Julian date format only. 2452384 is an example of a Julian date.
Maps: If you enter a street address, a link to Yahoo Maps and to MapBlast will be presented.
Phone: enter anything that looks like a phone number to have a name and address displayed. Same is true for Something that looks like an address (include a name and zip code)
Site:www.somesite.net "+www.somesite.+net"(tells you how many pages of your site are indexed by google)
Allintext: searches only within text of pages, but not in the links or page title
Allinlinks: searches only within links, not text or title
Memory Performance Tweak
Operating systems: Windows XP Pro, Windows XP Home
These Settings will fine tune your systems memory management -at least 256MB of RAM recommended
go to start run regedit -and then to the following key
Code:
HKEY_LOCAL_MACHINE/SYSTEM/CurrentControlSet/Control/Session Manager/Memory Management
1.DisablePagingExecutive -double click it and in the decimal put a 1 - this allows XP to keep data in memory now instead of paging sections of ram to harddrive yeilds faster performance.
2.LargeSystemCache- double click it and change the decimal to 1 -this allows XP Kernal to Run in memory improves system performance alot
3.create a new dword and name it IOPageLockLimit - double click it and set the value in hex - 4000, if you have 128MB of ram, or set it to 10000 if you have 256MB,.... or it to 40000 if you have more than 512MB of ram -this tweak will speed up your disckcache
Reboot and watch your system fly.
Enable or disable boot defrag
Filed under: operating systems windows xp Pro, windows xp Home
A great new feature in m*cro$oft Windows XP is the ability to do a boot defragment. This places all boot files next to each other on the disk to allow for faster booting. By default this option in enables but on some builds it is not so below is how to turn it on.
Start Regedit.
Navigate to
Code:
HKEY_LOCAL_MACHINE/SOFTWARE/microsoft/Dfrg/BootOptimizeFunction
Select Enable from the list on the right.Right on it and select Modify.Change the value to Y to enable and N to disable.
Reboot your computer.
Launch apps with desired priority setting
Filed under: operating systems windows xp Pro, windows xp Home
This tweak will launch most executables with the priority setting you want it to have.
Let’s say you have a game installed called HIGH NEEDS and the executable is called HN.exe
Here’s what to do:
-Create a new textfile in the game-app wathever-directory (let’s say C:HN), but instead of giving it the .txt extension you name it HN.bat
-Right-click this file and choose ‘Edit’, you’ll see it’ll open notepad. Put this line in:cmd /c start /High NH.exe
-Save (make sure you save it as .bat, not as .txt) and close.
Now create a shortcut to this file and place it on your desktop. Every time you doubleclick this shortcut HIGH NEEDS will open with priority set to ‘high’. (ofcourse you can also create a batchfile on your desktop, containing the full path of the app you want to start but the nice thing of creating a shortcut is you can give it an icon).
These are all the settings: Realtime, High, AboveNormal, Normal, BelowNormal, Low.
*Realtime is not recommended unless you have a dual-CPU system!
Increase the Browsing and Downloading speed in Windows Vista
With windows Vista you have noticed the slow internet speed. The web browsing and downloading speed is very slow as compare to previous versions of windows. You can open the same sites in windows XP and server 2003 with the normal speed.
Follow the given steps to increase the Vista browsing speed:
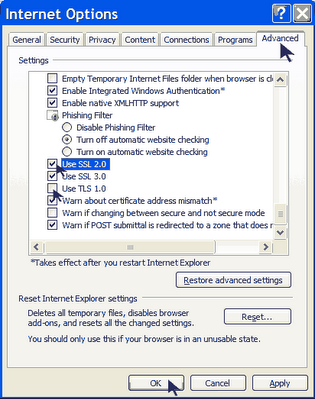
First go to Advance tab in Internet Explorer properties and turn off the TLS (Transport Layer Security) encryption option.
Here to fix problem with some secure pages turn on the SSL 2.0 (Secure Sockets Layer) feature and click Ok button to close it.
In windows Vista, the TCP autotuning feature is enabled by default. Some web servers do not respond properly to this feature, so it appears that some sites open with very slow speed.
To use this feature, you will need to be logged into your computer with administrative rights.
First click on Start button and type CMD in Run option then press Enter.
At Command Prompt, type the following command and press enter.netsh interface tcp set global autotuninglevel= disabled
This command will disable the TCP autotuning feature. Now close the command Prompt and restart your computer after any changes to go into effect.
You can easily restore these setting by typing the following command at Command Prompt.netsh interface tcp set global autotuninglevel= normal
Now close the command Prompt and again restart your computer after any changes to go into effect.
Follow the given steps to increase the Vista browsing speed:
First go to Advance tab in Internet Explorer properties and turn off the TLS (Transport Layer Security) encryption option.
Here to fix problem with some secure pages turn on the SSL 2.0 (Secure Sockets Layer) feature and click Ok button to close it.

In windows Vista, the TCP autotuning feature is enabled by default. Some web servers do not respond properly to this feature, so it appears that some sites open with very slow speed.
To use this feature, you will need to be logged into your computer with administrative rights.
First click on Start button and type CMD in Run option then press Enter.
At Command Prompt, type the following command and press enter.netsh interface tcp set global autotuninglevel= disabled
This command will disable the TCP autotuning feature. Now close the command Prompt and restart your computer after any changes to go into effect.
You can easily restore these setting by typing the following command at Command Prompt.netsh interface tcp set global autotuninglevel= normal
Now close the command Prompt and again restart your computer after any changes to go into effect.
How to remove trojan.w32.looksky {removal instructions}
Trojan.w32.looksky is another name for the Smitfraud/zlob trojan. SmitFraudFix removes trojan.w32.looksky, but you should also check your system for other malware, and use ATF cleaner to clean your temp files when finished.
Instructions to remove Trojan.w32.looksky using SmitFraudFix
SmitFraudFix only works with Windows XP or 2000
Download SmitfraudFix:Use this URL to download the latest version (the file contains both English and French versions):http://siri.geekstogo.com/SmitfraudFix.exe
Use:
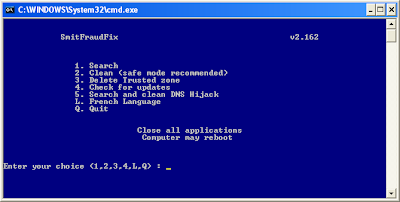
* Search:
o Double-click SmitfraudFix.exe
o Select 1 and hit Enter to create a report of the infected files. The report can be found at the root of the system drive, usually at C:\rapport.txt
 Clean:
* Reboot your computer in Safe Mode (before the Windows icon appears, tap the F8 key continually)
* Double-click SmitfraudFix.exe
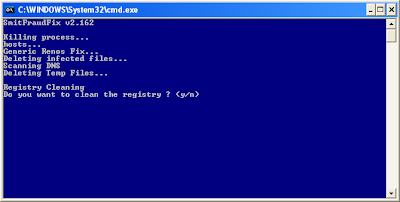
* Select 2 and hit Enter to delete infect files.
* You will be prompted: Do you want to clean the registry ? answer Y (yes) and hit Enter in order to remove the Desktop background and clean registry keys associated with the infection.
* The tool will now check if wininet.dll is infected. You may be prompted to replace the infected file (if found): Replace infected file ? answer Y (yes) and hit Enter to restore a clean file.
* A reboot may be needed to finish the cleaning process. The report can be found at the root of the system drive, usually at C:\rapport.txt
 * Optional:
o To restore Trusted and Restricted site zone, select 3 and hit Enter.
o You will be prompted: Restore Trusted Zone ? answer Y (yes) and hit Enter to delete trusted zone.
Note:
process.exe is detected by some antivirus programs (AntiVir, Dr.Web, Kaspersky) as a "RiskTool". It is not a virus, but a program used to stop system processes. Antivirus programs cannot distinguish between "good" and "malicious" use of such programs, therefore they may alert the user.
Here: http://www.beyondlogic.org/consulting/processutil/processutil.htm
Instructions to remove Trojan.w32.looksky using SmitFraudFix
SmitFraudFix only works with Windows XP or 2000
Download SmitfraudFix:Use this URL to download the latest version (the file contains both English and French versions):http://siri.geekstogo.com/SmitfraudFix.exe
Use:
* Search:
o Double-click SmitfraudFix.exe
o Select 1 and hit Enter to create a report of the infected files. The report can be found at the root of the system drive, usually at C:\rapport.txt
Clean:* Reboot your computer in Safe Mode (before the Windows icon appears, tap the F8 key continually)
* Double-click SmitfraudFix.exe
* Select 2 and hit Enter to delete infect files.
* You will be prompted: Do you want to clean the registry ? answer Y (yes) and hit Enter in order to remove the Desktop background and clean registry keys associated with the infection.
* The tool will now check if wininet.dll is infected. You may be prompted to replace the infected file (if found): Replace infected file ? answer Y (yes) and hit Enter to restore a clean file.
* A reboot may be needed to finish the cleaning process. The report can be found at the root of the system drive, usually at C:\rapport.txt
* Optional:o To restore Trusted and Restricted site zone, select 3 and hit Enter.
o You will be prompted: Restore Trusted Zone ? answer Y (yes) and hit Enter to delete trusted zone.
Note:
process.exe is detected by some antivirus programs (AntiVir, Dr.Web, Kaspersky) as a "RiskTool". It is not a virus, but a program used to stop system processes. Antivirus programs cannot distinguish between "good" and "malicious" use of such programs, therefore they may alert the user.
Here: http://www.beyondlogic.org/consulting/processutil/processutil.htm
Change Yahoo! Messenger Title Bar
Change Yahoo! messenger title bar
Hey guys you can change the yahoo messenger title bar...
For this just find the folder messenger in the drive in which the messenger is installed. Then search a file named "ymsgr". Open it in "notepad".
In this file just go to the end and write the following code:
[APP TITLE]
CAPTION=Gautam's Messenger
Here you can write any name in place of "Gautam's Messenger"... then see the fun.... You can have your own name being placed in yahoo messenger title bar.

Unlocking more space on your HDD
Required items:
Ghost 2003 Build 2003.775 (Be sure not to allow patching of this software) 2 X Hard Drives (OS must be installed on both.) For sake of clarity we will call the drive we are trying to expand (T) in this document (means Target for partition recover). The drive you use every day, I assume you have one that you want to keep as mater with your current OS and data, will be the last dive we install in this process and will be called (X) as it is your original drive.
1. Install the HDD you wish to recover the hidden partitions (hard drive T) on as the master drive in your system with a second drive as a slave (you can use Hard Drive X if you want to). Any drive will do as a slave since we will not be writing data to it. However, Ghost must see a second drive in order to complete the following steps. Also, be sure hard drive T has an OS installed on it You must ensure that the file system type is the same on both drive (NTFS to NTFS or FAT32 to FAT32, etc)
2. Install Ghost 2003 build 2003.775 to hard drive T with standard settings. Reboot if required.
3. Open Ghost and select Ghost Basic. Select Backup from the shown list of options. Select C:\ (this is the drive we want to free partition on on hard drive T) as our source for the backup. Select our second drive as the target. (no data will be written so worry not). Use any name when requested as it will not matter. Press OK, Continue, or Next until you are asked to reboot. Critical step.
4. Once reboot begins, you must shutdown the PC prior to the loading of DOS or any drivers. The best method is to power down the PC manually the moment you see the BIOS load and your HDDs show as detected.
5. Now that you have shutdown prior to allowing Ghost to do its backup, you must remove the HDD we are attempting to expand (hard drive T which we had installed as master) and replace it with a drive that has an OS installed on it. (This is where having hard drive X is useful. You can use your old hard drive to complete the process.) Place hard drive T as a secondary drive in the system. Hard drive X should now be the master and you should be able to boot into the OS on it. The best method for this assuming you need to keep data from and old drive is:
Once you boot into the OS, you will see that the second drive in the system is the one we are attempting to expand (hard drive T). Go to Computer Management -> Disk Management
You should see an 8 meg partition labeled VPSGHBOOT or similar on the slave HDD (hard drive T) along with a large section of unallocated space that did not show before. DO NOT DELETE VPSGHBOOT yet.
6. Select the unallocated space on our drive T and create a new primary or extended partition. Select the file system type you prefer and format with quick format (if available). Once formatting completes, you can delete the VPSGHBOOT partition from the drive.
7. Here is what you should now see on your T drive.
a. Original partition from when the drive still had hidden partitions
b. New partition of space we just recovered.
c. 8 meg unallocated partitions.
8. Do you want to place drive T back in a PC and run it as the primary HDD? Go to Disk Management and set the original partition on T (not the new one we just formatted) to and Active Partition. It should be bootable again if no data corruption has occurred.
Caution:
Do not try to delete both partitions on the drive so you can create one large partition. This will not work. You have to leave the two partitions separate in order to use them. Windows disk management will have erroneous data in that it will say drive size = manus stated drive size and then available size will equal ALL the available space with recovered partitions included.
This process can cause a loss of data on the drive that is having its partitions recovered so it is best to make sure the HDD you use is not your current working HDD that has important data. If you do this on your everyday drive and not a new drive with just junk on it, you do so at your own risk. It has worked completely fine with no loss before and it has also lost the data on the drive before. Since the idea is to yield a huge storage drive, it should not matter.
Do this carefully, if anything goes wrong, I am not responsible of it.
Interesting results to date:
Western Digital 200GB SATA
Yield after recovery: 510GB of space
IBM Deskstar 80GB EIDE
Yield after recovery: 150GB of space
Maxtor 40GB EIDE
Yield after recovery: 80GB
Seagate 20GB EIDE
Yield after recovery: 30GB
Unknown laptop 80GB HDD
Yield: 120GB
New Airtel Live! Free Trick (All India)
New Airtel Live! free trick (All India)
Just go to
http://www.google.co.in/gwt/n
through Airtel Live!. Then type the address there. You can open any site from there for free !
Note- Surfing through Airtel Live! must be free in your state.

Customize Windows Media Player Title Bar
Customize Windows Media Player Title Bar
Allows you to change the title bar to read Windows Media Player provided by , so if I had entered text of [The Elder Geek], it would read: Windows Media Player provided by The Elder Geek
[Start] [Run] [Regedit]
Registry Key: HKEY_CURRENT_USER\Software\Policies\Microsoft
Create the Key [WindowsMediaPlayer].
Modify/Create the Value Name [TitleBar] according to the Value Data listed below.
Data Type: REG_SZ [String Value] // Value Name: TitleBar
Value Data: [Enter the text to be displayed in the title bar.]
Note: Whatever text you enter as the value data will be preceded by:
Windows Media Player provided by, so if I had entered text of [The Elder Geek], it would read:
Windows Media Player provided by The Elder Geek
Exit Registry and Reboot
Note: Not works in WMP11
Use Microsoft Calculator to surf Internet
How to access the internet via your standard Microsoft Calculator?
When your browser(s) is/are messed up for some unexplainable reason*
1. Open your MS Calculator. This is normally found in Start => All Programs => Accessories => Calculator.
2. Open the help-window by pressing the F1 key.
3. Click the top-left corner icon of the help window once (Standard is a Document with a yellow Questionmark).
4. Select Jump to URL...
5. Type your address into the avaliable field, but remember to type http://, and not just www. (or equivalent).
6. Have fun!
The 10 Minute Email Address
Welcome to 10 Minute Mail.
By clicking on the link below, you will be given a temporary e-mail address. Any e-mails sent to that address will show up automatically on the web page. You can read them, click on links, and even reply to them. The e-mail address will expire after 10 minutes.
Why would you use this? Maybe you want to sign up for a site which requires that you provide an e-mail address to send a validation e-mail to. And maybe you don't want to give up your real e-mail address and end up on a bunch of spam lists. This is nice and disposable. And it's free. Enjoy!
PS: You can also get an extension on the 10 minutes if you haven't gotten the email you expected yet. It renews in increments of 10 minutes...
This is very handy and useful guys.
Click Here
Comment if you like this.....
Changing the DOS background colour
The value DefaultColor controls the foreground and background colors used in command prompt windows. It has a default value of 0, for standard white text on a black background.
CHANGING DOS BACKGROUND
Open your registry (press win+r and type regedit, hit enter)
goto
[HKEY_CURRENT_USER\Software\Microsoft\Command Processor]
u'll find "DefaultColor"
You can replace it's value with a two-digit hexadecimal number, in which the first digit selects a background color and the second a foreground color. The hexadecimal codes are:
Hexadecimal value Color
0 Black
1 Blue
2 Green
3 Aqua
4 Red
5 Purple
6 Yellow
7 White
8 Gray
9 Light Blue
A Light Green
B Light Aqua
C Light Red
D Light Purple
E Light Yellow
F Bright White
A value of F0, for example, would give black text on a white background, and 1E would yield yellow text on a blue background.
The change should take effect the next time you open a console window.
Subscribe to:
Posts (Atom)
